Choosing a paint color can feel like a daunting task. We’ve all been there! But how do you come out victorious on the other side? Read my beginners guide for all you need to know about how to sample and ultimately choose a paint color for you walls.
Recently, I have started a transformation project to turn our guest room into a nursery for our first baby. We are not finding out gender, so I need to keep it neutral! My vision is a sage green pain color on the walls in some capacity, but there are so many options.
I’ve been here before though, and I know I will make the right choice. I have a foolproof step by step paint sampling process that hasn’t failed me yet! I have painted not only every interior wall of our Riverdale Ranch, but also trim, doors, furniture and exterior. One more room shouldn’t be too hard…
Let’s start at the beginning!
Step 1: Start Researching
I love Pinterest, and think it’s a great tool to start gathering initial inspiration. Pinterest is a visual search engine with website links to follow for images you are interested in. You can read all about the photo you were visually drawn to. I always use Pinterest first and create a new “board” (essentially a folder) to organize and hold all my inspiration pictures. This is the time for you to search keywords that align with your project and “pin” (or save) anything that catches your eye. Hopefully, this will create an entire vision board for you to pick and choose elements from to carryout your own unique project.

I find spaces that have a similar vibe to what I hope to achieve, and start a board to collect all the pins. Once I have a good amount of inspiration, I start to analyze what elements of the rooms or inspiration pictures I am drawn to. Often, I notice running themes and possibly even the same paint color or patterns showing up again and again. This helps to guide early decisions so that I can make a mood board.
Step 2: Make a mood board
To tie your research process and inspiration together, I recommend creating a design or mood board. I made one for my pop-up camper flip project and outdoor patio One Room Challenge project electronically using Canva. It helps to visualize all of the elements together to make sure everything looks cohesive and flows. It’s a great addition to the planning process if you are more of a visual person (like me!). I like to see it all together before I begin, instead of just imagining it together. I made one for the nursery project too. See what I mean?

I don’t have a tutorial on this, but Lauren at Blesserhouse.com put together a great resource. Also, Alisa at A Glass of Bovino is known for her beautiful design boards. You are sure to catch them frequently on her Instagram. And last, Made by Madeline Design actually provides virtual styling services! You can find her here on Instagram– she has loads of design board inspiration on her feed as well.
If your DIY project is smaller in scale, I recommend using the drawing feature on your phone to edit a current photo of the space. For example, I have thought about painting our garage door black. To help visualize this, I painted black to cover the garage door space on a current photo of the exterior of my home in the Photos app.
I would also like to add that it’s easier to start with a rug or piece of art as a color pallet first, then choose a coordinating paint color. It’s much harder to choose a paint color first, then try and find decor to match.
Step 3: Collect Paper Sample Cards
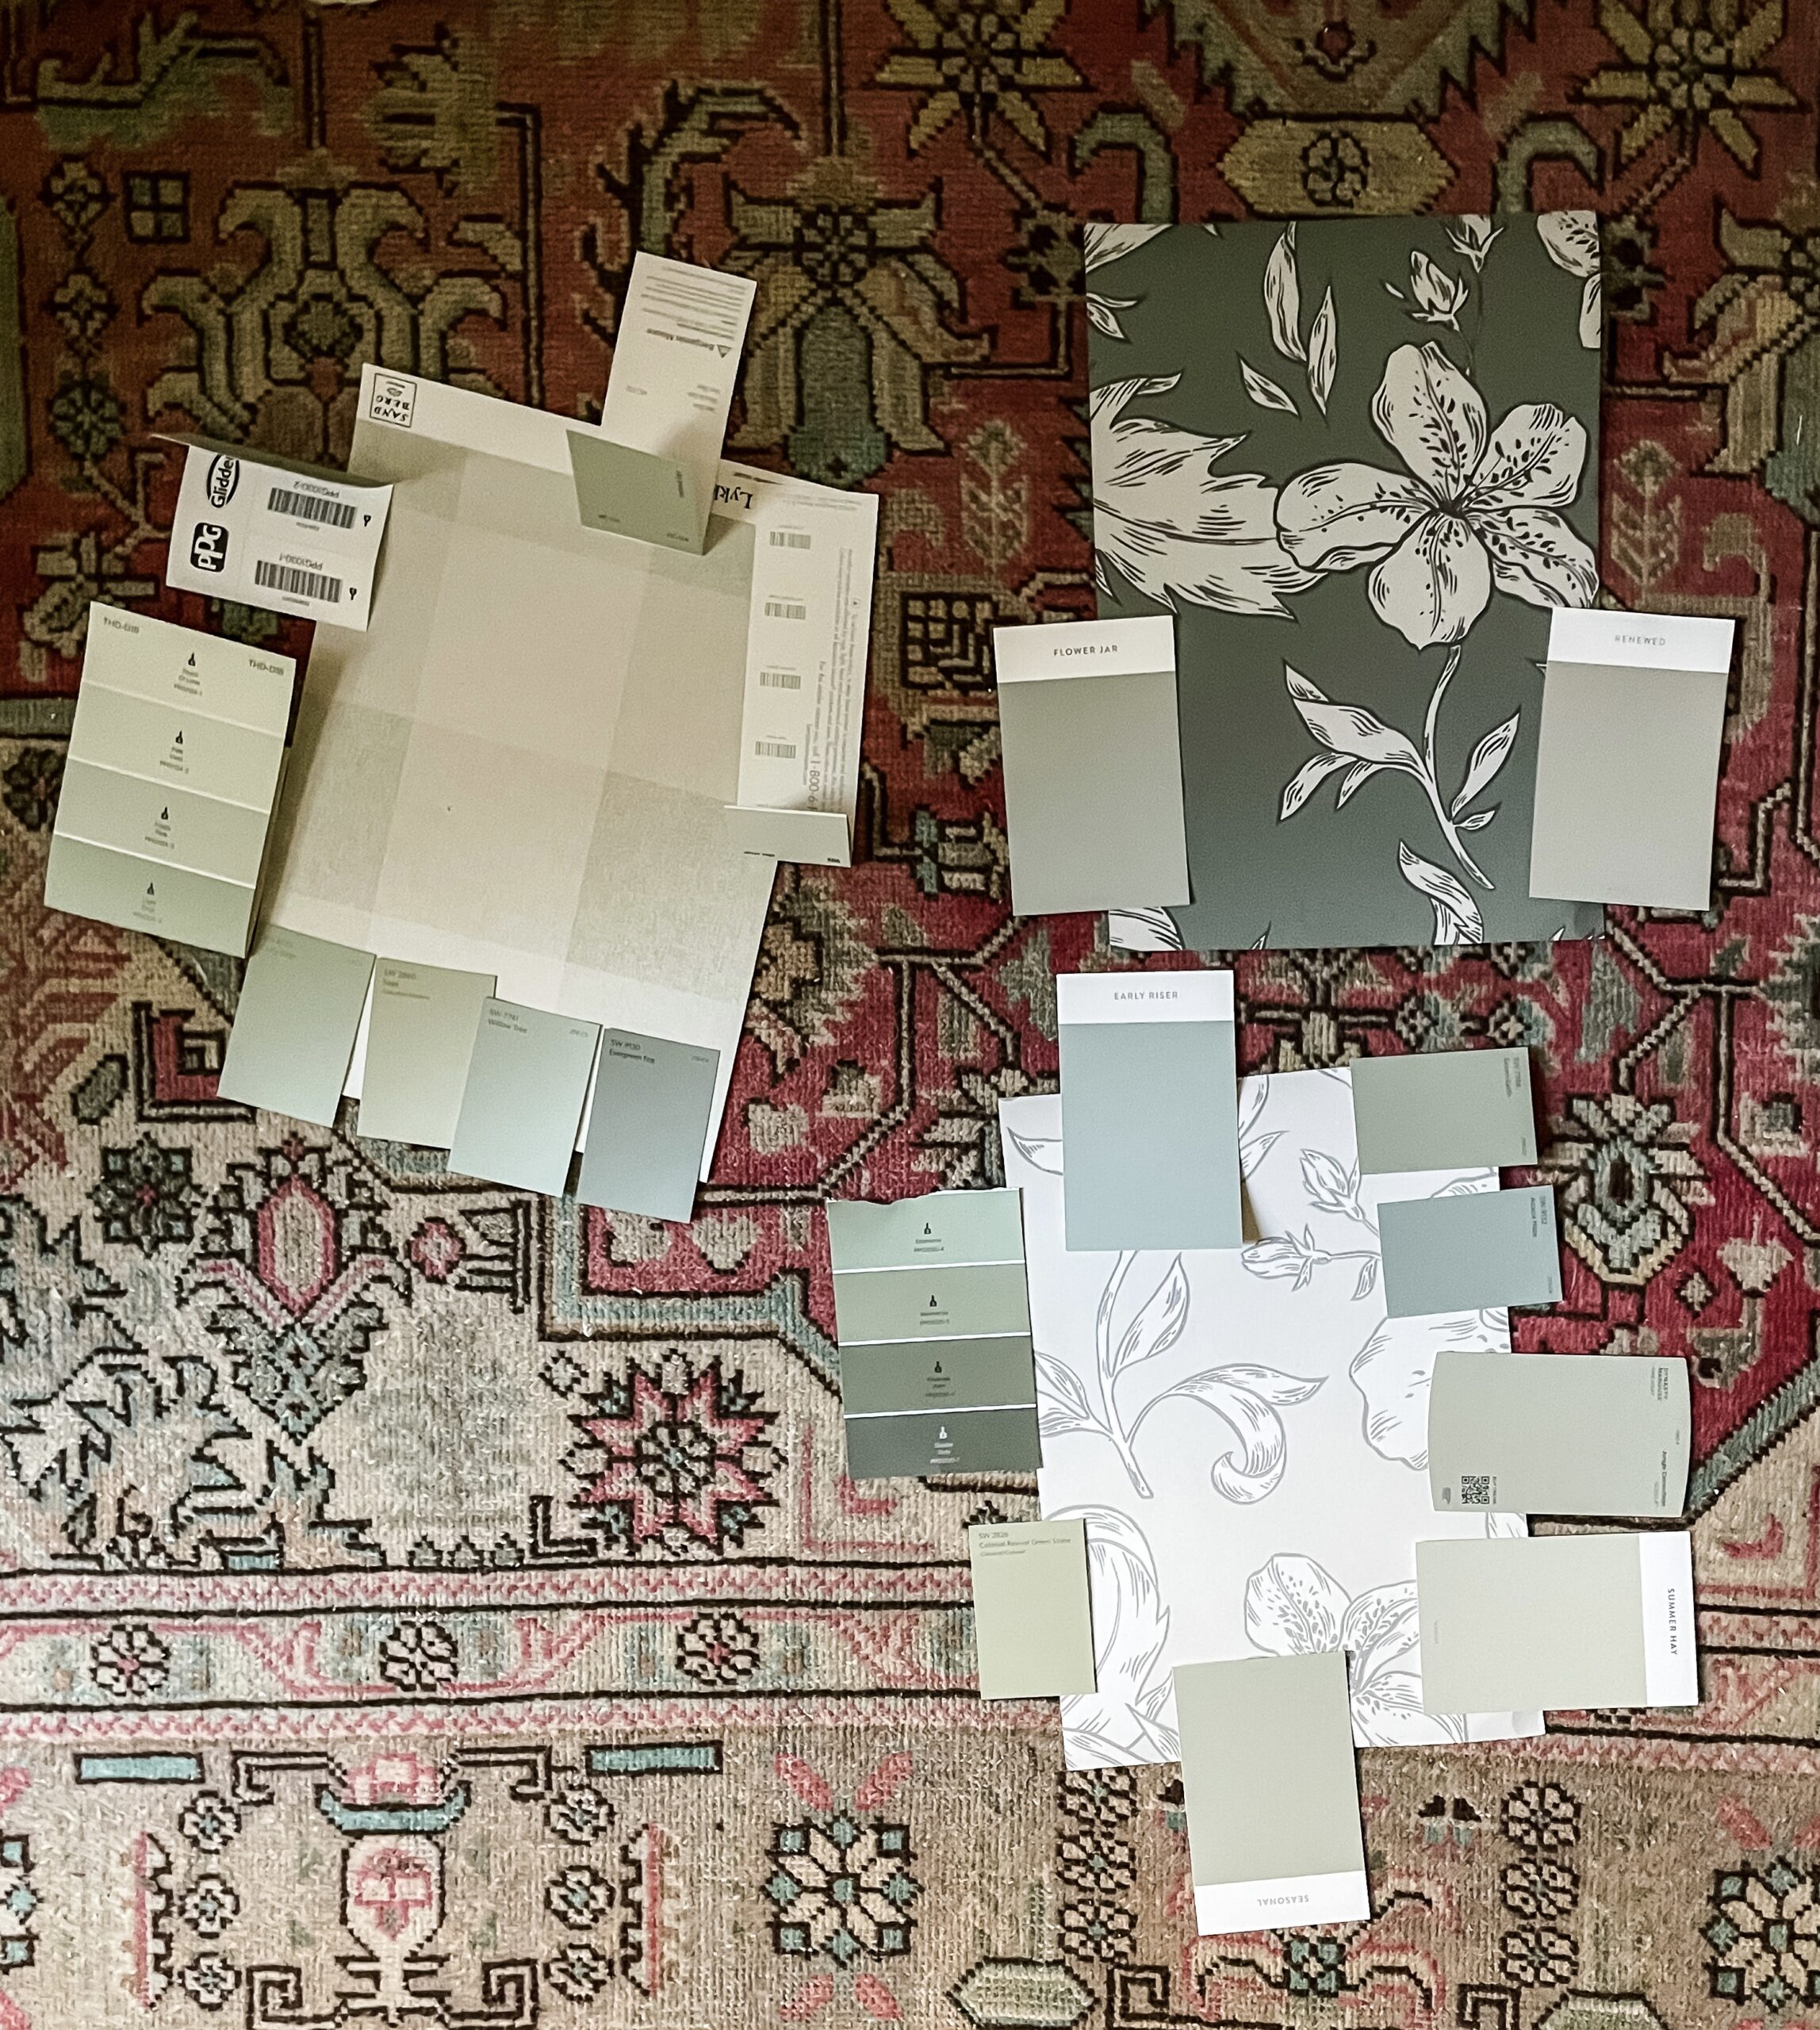
If we are going to start at the very beginning, I recommend getting paper color swatches of all the paint colors you think you may be interested in. This is the cheapest way to start to visualize the colors in your space.

For the nursery project, I collected over 20 different swatches to try with the rug and wallpaper samples I had gathered. Keep in mind, you will have to go to different places to collect samples of colors from different brands. I.e.- Sherwin Williams, Benjamin Moore, Valspar (Lowe’s), Behr (Home Depot), Magnolia (Ace), etc.
Step 4: Purchase Paint Samples
Once you have narrowed down a list of front running colors from the paper paint swatches, it’s time to get physical paint sample pots. My favorite way to do this is to use Lowe’s or Home Depot for the actual sample pots of paint. They offer small paint pots that run between $4-6. A sample of paint at Sherwin Williams comes by the quart and costs closer to $10. They say the quality of the paint sold in the sample quarts is poor and not recommended for use on walls, trim, doors, etc. so if you are truly only needing to test the color, you end up with a lot of wasted paint.

Here is where things get a bit complicated. We are going to detour deep into paint color mixing and all the possibilities of mixing one brands paint color, into another brands physical paint.
Mixing Paint
The paint you purchase starts out white in the can. This is known as the “base”, or foundation. You can buy it anywhere (Sherwin Williams, Lowes, Home Depot, local paint shops, etc.), and price is based on quality. The more expensive paint offers better coverage, durability and ability to clean.
Next comes color. I used to just ask for the name and brand of the color I need (i.e ask for Sherwin Williams Agreeable Gray at Lowes, who sells Valspar brand paint), and they would find the “code” to mix the color in the system. So, just because you can ask for any brand’s color and mix it into any brand paint, does that mean you should? That’s a bit more complicated…
Did you know that most companies use different bases to make paint? Without getting too technical, think of the base as the foundation. These different foundations can affect he undertones of paint, causing it to pull warmer or cooler than the brand that “invented” the color intended.
Different brands also use different colorants or tints to make up their colors. If you want the color you chose from a paint swatch to be the color on your wall, you need to use the brand of paint your color was “invented” for. Using this logic, you should only get Sherwin William’s color Alabaster mixed at Sherwin Williams.

One Brand’s “Color” in Another Brand’s Paint
For example, I painted some interior walls Alabaster which is a Sherwin Williams color. I sampled Alabaster at Lowe’s, who has Valspar paint. Since Alabaster is not their color, they look up the “formula” to color match it into their Valspar base paint. I liked the Valspar formula for Alabaster mixed in their base, so I ordered my gallon of paint from Lowe’s as well. So, the same version of Alabaster I sampled and liked on the wall from Lowe’s went into the gallon I used to paint my walls.
So, should you get one brand’s color matched into another brand’s paint?
Moral of the story is it depends how particular you are. My recommendation is to get samples of the colors you are interested in trying from the same brand you end up buying gallons from. So another way to drive this point home… do NOT get your sample of Sherwin William’s color Alabaster from Sherwin Williams, paint a sample on the wall, decide you like it then get the gallon you intend to use for your walls color matched at Lowe’s. In this case, the color would not match what you sampled and liked on your walls because of the different base and tints used at Lowe’s.
Same goes for multiple gallons. If you need a second gallon of paint to finish a room, get it from the same brand as the first gallon.
I made this mistake in our hallway. There was a small area left to paint, and I ran out of the last gallon of Valspar’s Asiago I had. I was already at Home Depot, so I just got a small quart of Asiago to finish up the job. Asiago is a Valspar color, and the first gallon I used was from Lowe’s. As I was painting the rest of the hallway with the quart from Home Depot, the colors did not appear to match. I thought maybe it was just the difference between wet and dry paint. But now I know the colors more than likely did not match based on the different base and tints used to create them. You live and you learn!

Another option would be to use the color matching service a bit differently, and provide an actual physical chip or swatch of the color you want. In the scenario above, I could have gently removed a small paint chip from the wall I needed paint to match. Then, take the paint to chip to the big box store and request an exact paint color match. This is a physical way to ensure the first color is a match to the color they mix, with less chance that a different base color or formula will interfere.
For the nursery I provided the actual, physical paper paint swatches to the paint department at Home Depot. This way, they could mix the paint to that color exactly without using their “code” for that color, which may not be an exact match.
Step 5: Test Out Samples on White Foam Board
To properly sample paint, purchase white foam or poster board and paint a large swatch of your paint sample(s). Then, move the sample board around the room to see how light affects and changes it at different times throughout the day. Painting your samples against a white background also gives you the truest representation of the color, and any undertones. Sometimes, painting a sample right on the wall first may be affected by the color beneath it.


Did you know… you can ask to lighten or darken any color! If you find the perfect color but feel the saturation is too dark, you can ask the paint store to lighten the color by 25%, 50% or 75%. You can do the same if you feel the color is too light, but love the base shade. This maintains the integrity of the hue, while lightening strength or saturation of the color to your liking. I have Agreeable Gray on my kitchen, living room and dining room walls. However, my sister felt it was too dark in her space, but loved it lightened 25%!
Step 6: Paint Samples on the Wall
Wow, who knew it took 6 steps to get the point of being ready to actually put some paint on the wall! At this point, hopefully you feel confident about 1-3 colors, and are ready to actually test them on the wall in your space. I recommend painting 2 coats of large swatches in different places around the room. Then, analyze the samples at different times during the day to see how light affects the color.

Sometimes, other elements of the room may throw off the color too that may not have been obvious until the paint got up on the wall. For example, At first, I planned to paint the entire house Agreeable Gray since it looked so good in the entryway, dining room, kitchen and living room. However, what I didn’t consider was how the different color flooring would affect the way the paint looked on the walls. They talk about undertones, and I was able to see and understand that firsthand.
I started painting the hallway walls Agreeable Gray, and I swear they looked green. I thought the paint was somehow mixed differently than the first batches I used in the rest of the house. Why did the color look COMPLETELY different in there? Then I thought about the different flooring and lighting, and realized how much of an impact they can have on how a paint color is represented.
Bonus: Wondering what colors I have chosen to paint all the walls, trim, doors and exterior of our home? I put together a whole house paint color post to share how I went through this process throughout our entire home, and which colors I ultimately chose for each space.
Step 7: Paint Your Walls
It is finally time to paint your walls with the RIGHT color. After all that thought, I am confident you will be happy with your selection! In the off chance you aren’t, don’t worry it’s just paint. Paint is never permanent.
My step by step painting process is a post for another day. You can learn more about it if you are a beginner, or just want to make sure your process is as efficient as possible. Painting is one of my favorite things to do, and often the easiest and cheapest way to transform a space. I hope you learned a little something about how to sample paint! Let me know if you have any questions.


