Covid has caused a lot of change- notably in the way families feel comfortable traveling. Whether temporary or permanent, a lot of folks have stayed out of the sky and instead hit the road! And what better way to travel than a pop up camper? Let me teach you how to complete a pop-up camper DIY remodel like a pro and more importantly, on a budget.
We bought a pop-up camper! The title has been transferred, money paid, rig delivered to our driveway… now it’s real. The bones of the camper are great, especially for a ’99. But there were definitely signs of age and wear.
I’m going to break down this whole process into 6 different projects that took Piper the pop-up from drab to fab both affordably, and at a beginner’s skill level.


This post contains affiliate links for your convenience which may reward me in the event of a sale. Note that I only recommend tools and products I have personally used and loved.
Project 1: Clean & Assess
The exterior was filthy and both the interior and exterior of the canvas had signs of mildew. Because we did our homework when buying our camper, we were confident the dirt and dust was only skin deep. But just to be sure, I recommend a thorough inspection while cleaning.

First I tackled he exterior while the camper was closed. Thanks to @GoCleanCo, I used their trusty bleach, hot water and Tide mixture to scrub everything down. I used a handheld scrub brush, and worked my way around the camper. After scrubbing a small section, I rinsed it off with a hose. I want to be clear, only use this on the hard exterior shell of the camper. The canvas is sensitive and usually has some form of waterproofing on the surface that you want to be careful with.

Once the hard shell exterior was sparkling, I moved onto the canvas. To clean the canvas, you will need to crank the camper open. I used Oxyclean spray, a microfiber cloth, and plenty of good old fashioned elbow grease. The canvas didn’t come clean easily, and I may have been better off using Bass Pro Mold & Mildew (I just didn’t want to go buy another product).

After the canvas looked good as new, it was onto the cushions. Based on the state of everything else in the camper, my guess was they had never been washed. the cushion covers were dirty, and showed signs of stains and potential water damage. As I unzipped and removed them, they were partially wrapped with thin, dated, yellowed plastic wrap, I’m assuming in an effort to “waterproof”.

I threw out the old plastic wrap and cushion covers, and had a cheap plan to recover them (more on that later).
To start, I laid old blankets in the driveway as a barrier from the ground, and put all the bare cushions on top. I generously sprinkled baking soda and let them set for 2-3 hours before flipping and repeating on the other side. After both sides had been treated with baking soda, I sprayed them with half and half water and white vinegar, and let dry in the sun. this treatment took care of the scent my husband so lovingly referred to as “boy scout camp”.
This should take care of most of the cleaning early on. The inside of the camper gets dirty during the DIY process, so it’s best to save that cleaning for the end!

Enjoying the reveal? Pin it so you can keep it safe and save the project ideas for later!
Project 2: Paint
I’m not sure if there is an interior surface of this camper that did not get refreshed by paint. Never underestimate paint’s power to transform!
The first surface to get painted was the cabinets. This is actually my first experience painting cabinets (after I made a bold statement in the past regarding 5 reasons to NEVER paint wooden cabinets). But never say never. This opportunity was different, and painting the cabinets brought so much fun color to this space.

It is a time consuming process, but you want to be proud of your results so that means doing it right. My process included 4 steps: prep, prime, paint and optional- sealing. For the complete supply list and step by step tutorial, refer to the original post to learn how to paint wooden cabinets with maximum durability.
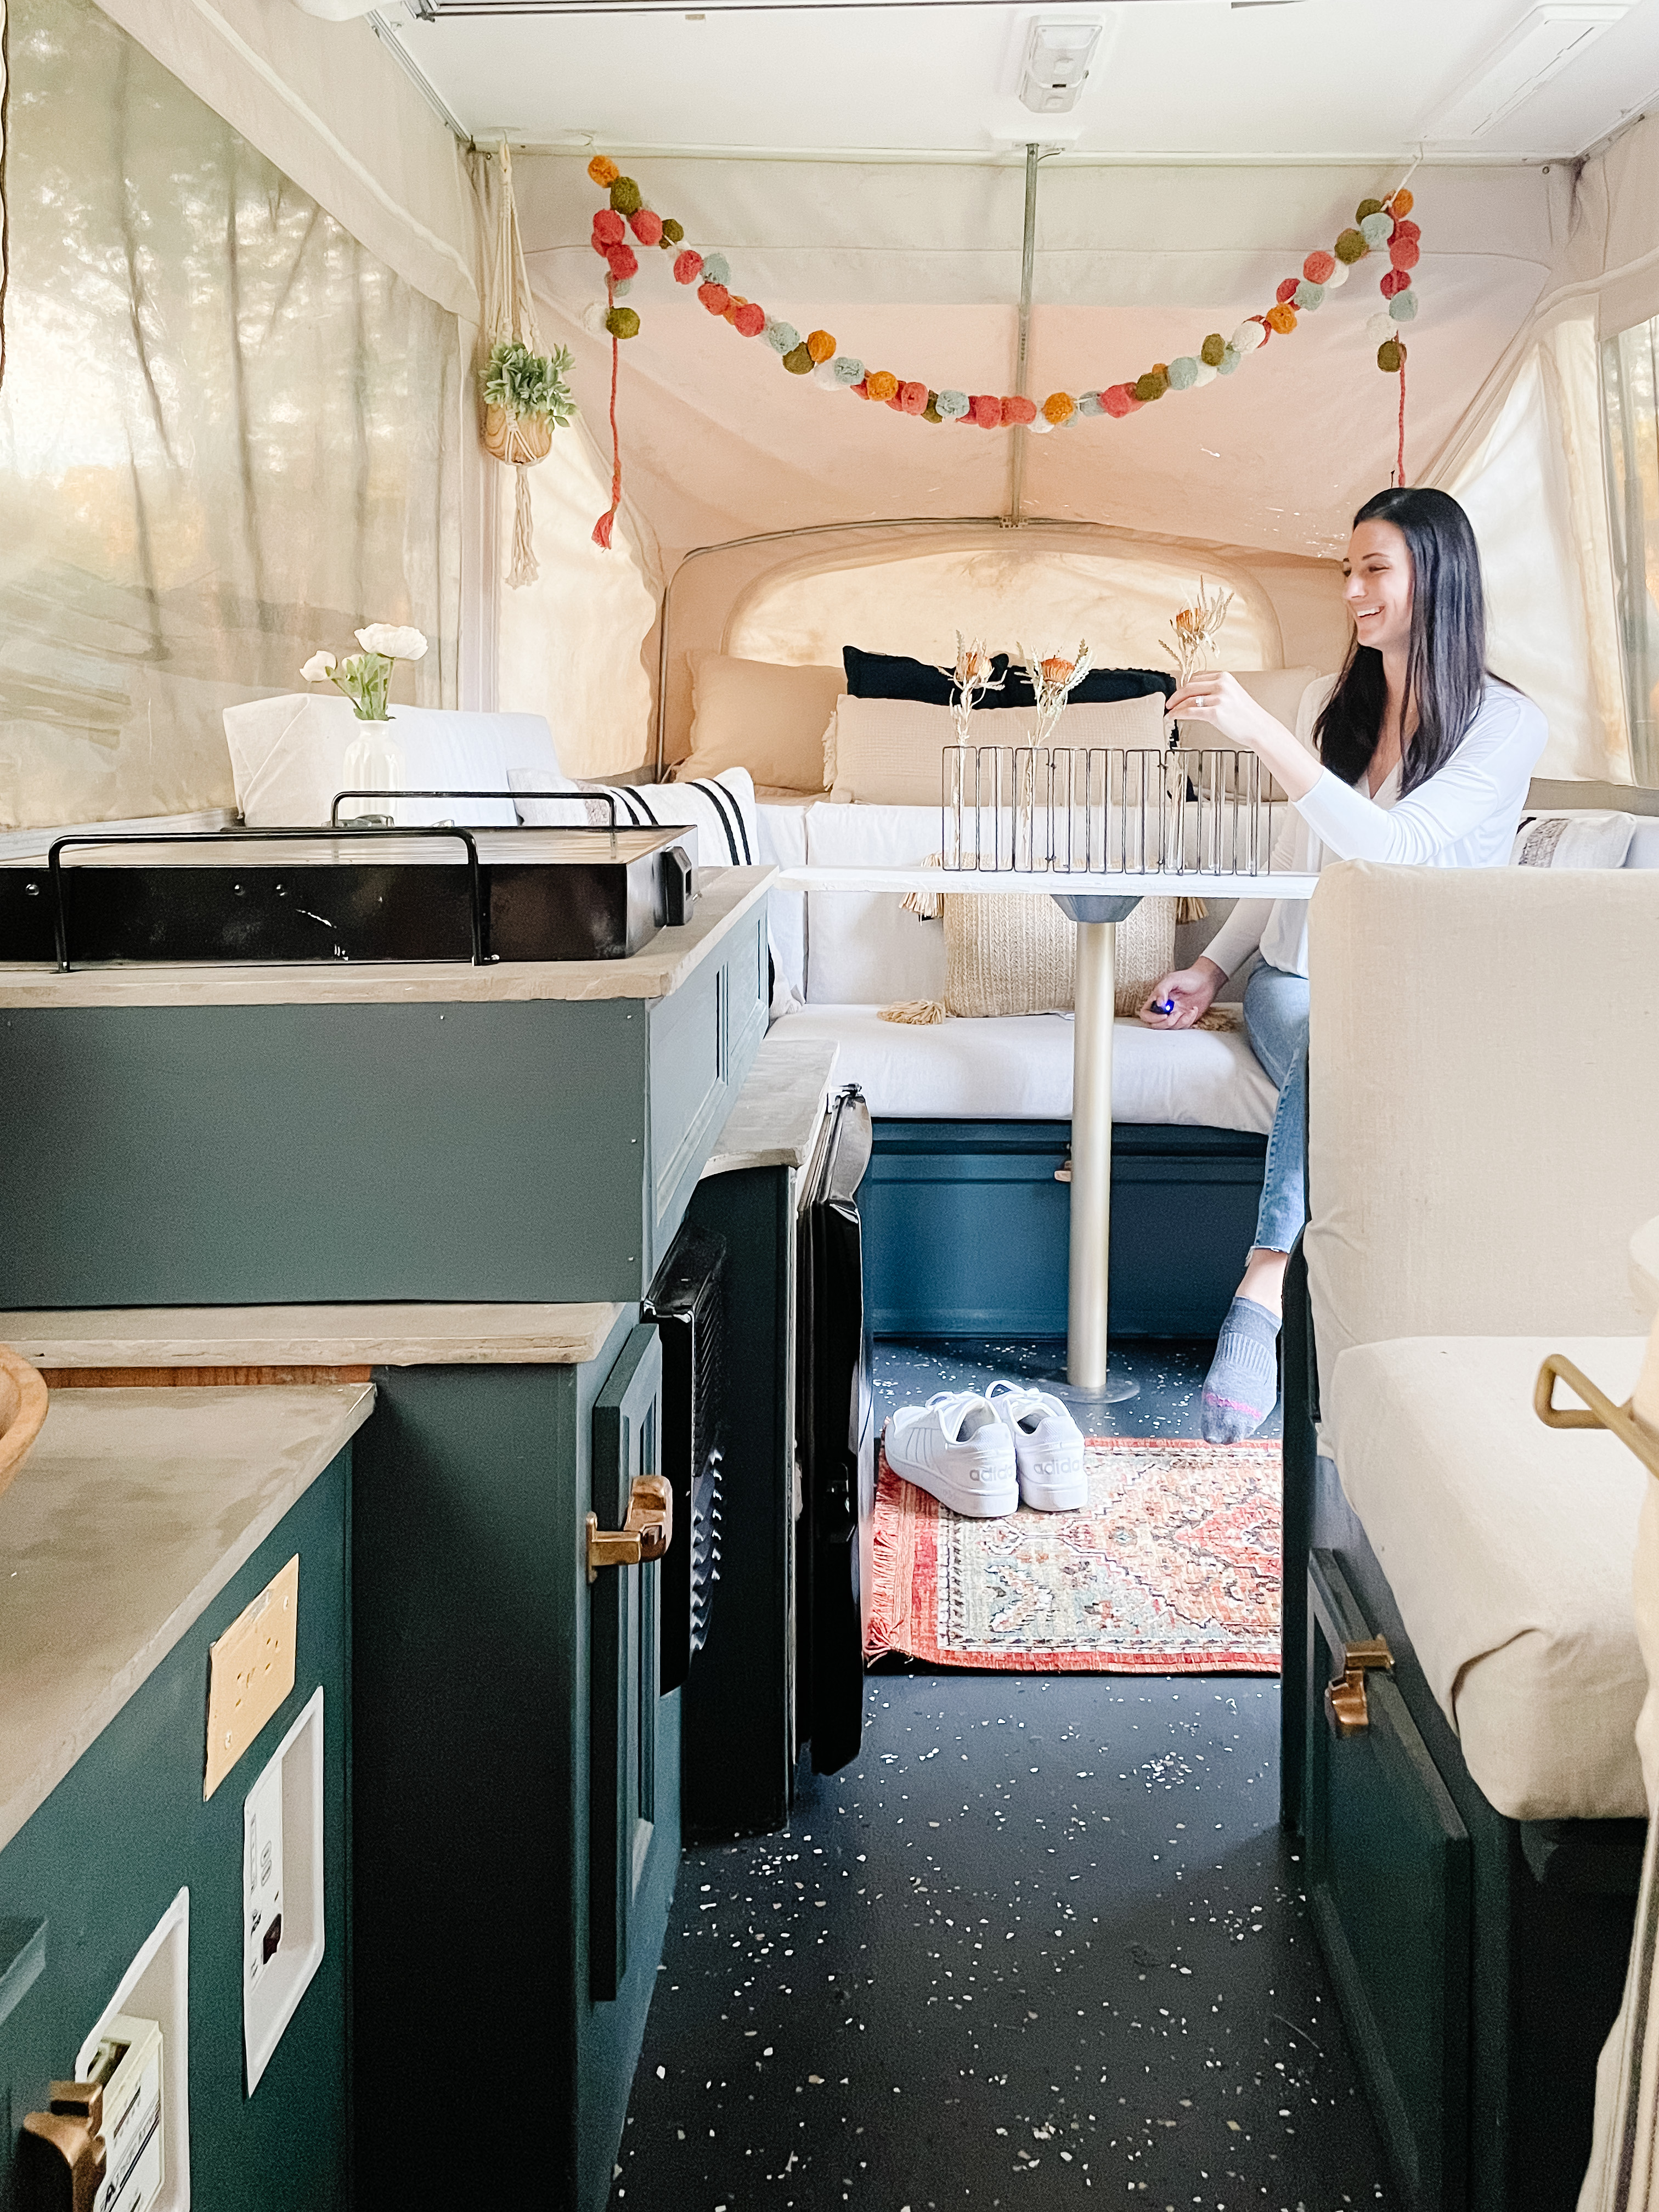
Oh, did I mention the ceiling and walls also got a fresh coat of paint? I primed them too, then painted with the color Alabaster by Sherwin Williams. Just the white paint alone helped to brighten everything up SO much.

After the cabinets, multiple surfaces received a coat of spray paint. I sprayed the refrigerator, stove and heater cover with Appliance Epoxy spray, intended for interior metal surfaces.


Now for the more tedious, but still important details. The table legs were beige plastic. That blah just wouldn’t do when everything else was getting a refresh. I chose gold, and spray painted the table legs. Once the gold was dry, I spritzed a layer of clear gloss in hopes of added protection.


And last (but not least), I gave the hardware some attention. It was already gold, but was worn and more of a brass color. I wanted to give them a quick refresh to brighten them up. I used Rub ‘n Buff in the shade Antique Gold, applied with a small paintbrush.

Project 3: Pop-up Camper DIY Countertop Remodel
Ohhhh the countertops. I think a dated beige laminate is pretty standard in campers. When I helped a neighbor revamp her RV, she chose contact paper to update her counters. I think there are pros and cons to every countertop option. For example, contact paper can be difficult to apply smoothly, and is best done as a 2 person job. Cutting around sinks, etc. can also be difficult to do accurately.
However, after both experiences I think the contact paper ended up being quicker than the route I chose. I wanted to do something different that I had never seen before in a camper, and chose a faux concrete product to update the counters.

Three coats of feather finish later with multiple batches of mixing and sanding in between. It took me longer than expected, but overall I love the final result. It’s definitely different, but should be an aesthetically pleasing and durable camper solution.


Project 4: Pop-up Camper DIY Flooring Remodel
Woof. The floor gave me enough of a head ache to throw in the towel. But I’m so glad I didn’t! This is a prime example of the wrenches DIY will throw at you. Plan A for the floors, failed. Plan B- also failed. So… onto plan C? And you know what, it’s ok because I love them!

Painting floors was a first for me after my dreams of a warm wood flooring fell through. Plan A was luxury vinyl plank flooring, then Plan B was peel and stick wood look floors. Check out the unexpected problems and time limits placed on this project that led to Plan C.

So, enter Plan C: dark painted terrazzo floors! They are so fun and unexpected. Find the step by step tutorial and supply list to execute these floors in a camper of your own, or a bathroom, laundry room, mudroom, etc. The possibilities are endless.
This technique is so much easier than painting then stenciling, or my first attempt at cutting and matching the tongue and groove LVP flooring into the puzzle that is a pop up camper floor. So do yourself a favor, and just plan to paint them in the first place!

Project 5: Pop-up Camper DIY Cushion Remodel
Updating the cushions may have had the biggest impact on the final product reveal. The neutral fabric let the colorful cabinets and dark floor shine, and allowed a blank canvas for throw pillows and rugs. I love the affordability of this project, and the texture from the drop cloth.


In just five steps, these cushions got a clean refresh. This project is definitely beginner friendly, but time consuming. I had 12 cushions to recover. It’s best to do this project in segments so you don’t get burnt out.


Project 6: Decorate
I spent the last 2 months taking my pop-up camper out of the 90’s and into this decade with my own two hands, so I needed to do it justice with top notch decor. I wanted the camper to feel like an extension of my home while keeping everything as functional as possible.
Anchor your design with a rug
You may have heard the interior design rule to begin with a rug and style your room around it. The same holds true for your camper. I chose this rug from Target to pull inspiration from. First I bought and tried the runner size, but it was a hair too wide for my space. I settled on the 2×3, and love the color it adds.

I chose the cabinet paint based on the colors in the rug. Starting with over 10 color samples on cards, I narrowed it down to 4 samples mixed at the store, and used my tried and true paint sampling method to settle on Midnight in NY by Behr. I have yet to go dark and moody with paint in my house, so I was excited to give it a try in my camper!

Build the beds
Next, I chose bedding. I wanted something thin and easy to launder, so I chose quilts. Keeping with the bold and colorful theme, I chose a dark clay color for one side, and oatmeal for the other. I already own Casaluna bedding on our master bed, so I can highly recommend their products.

As far as sheets, I always ensure I buy 100% cotton. I do like to bleach the sheets each time I wash, so I chose a white jersey knit set. I got a 2″ memory foam topper, and waterproof mattress cover to protect it all.
To finish off the beds, I added pillows and cozy throws. The throws can be used inside or out- I love having a blanket on campfire nights outside so we appreciate having this one in the camper.
Final Touches
I always think greenery breathes life into a space, and I’ve been known to add it creatively in and around my house. The camper needed the same touch of green, so I ordered a macramé Planter, pots and my favorite faux greenery.
I also found this fun pom pom garland to hang above one of the beds. To hang both the garland and planter from the ceiling, I used simple command hooks! I thought about installing D hooks that lay flat when you fold up the camper, but got nervous I would accidentally screw into some type of wiring hidden in the ceiling.

What do you think of the finished product? This was such a fun remodel. It’s always fun to stretch your DIY and decor skills with a new type of canvas. Let me know what you think of Piper’s glow up, and don’t forget to follow along on Instagram to see what project I get into next!


