You have a large blank wall, you know the one. We all have it. And you need something to cover that space! Look no further than a gallery wall. The idea is so versatile- it can look modern, vintage, or farmhouse.
“Your home should tell the story of who you are, and be a collection of what you love”
-Nate Berkus
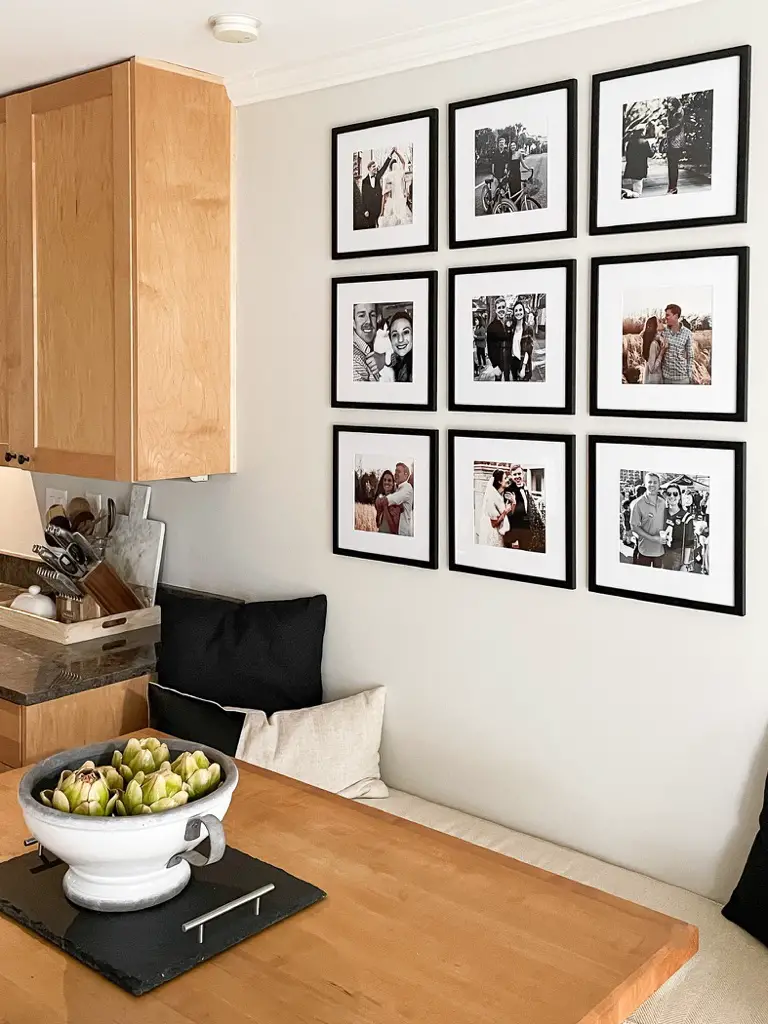
A gallery wall can also add personality and life to your space, which is something I’ve tried to incorporate as I have decorated our Riverdale Ranch. I urge you to do what makes YOU happy, not your guests or the internet (no matter how tempting). Your goal should be creating a space that brings you joy. Every time I walk past my gallery wall filled with our engagement, wedding, and travel photos it makes me smile and that’s what our homes should be about!
This “How To” is easy, so easy I actually did it while I had Covid (the second week- I wasn’t moving at all the first week), which proves a gallery wall is perfect for beginners.

This post contains affiliate links for your convenience which may reward me in the event of a sale. Note that I only recommend tools and products I have personally used and loved.
SUPPLIES
–Gallery Wall Frames- set of nine 12×12 frames matted to fit 8×8 photos
-Level
-Clear tape
-Nine 8X8 personal printed photos
-Hammer
-Nails
STEP 1: Choose your wall
Decide where you want the gallery wall to be. I personally love one in an entryway, living room, large hallway or kitchen/breakfast nook area. See my Pinterest board labeled “Gallery Wall” here to get inspiration for other locations to create and hang a gallery wall around the house!
STEP 2: Choose your photos
I saw this idea from Ashley Petrone of Arrows & Bow– she chose, edited and laid her photos out in her iPhotos library on her phone to get a visual idea of how they would look and flow together before printing. I used to print an excess of photos just to physically arrange and visualize before hanging, but you save time and money doing this step on your phone! You also want to choose a cohesive color scheme- black and white always looks clean and timeless especially with black frames, but I added a few in color to mine! It helps to choose the same filter on all the photos to make the colors in the pictures look similar. I chose a warmer filter to work off the warm tones in our kitchen cabinets.

STEP 3: Print photos
You can do this anywhere- Walgreens, Costco, Sams Club, Shutterfly, etc. I typically use Sams Club or Shutterfly (order online and they ship straight to your house!) and have never been disappointed with quality. My photographer always recommends Nationsphotolab.com, SmallwoodHome.com, MPix or Miller’s Professional. If you are using the frames linked above, print square 8 x 8 photos.
STEP 4: Tape template to wall & mark nail holes
What I love about this set of frames is they come with a full size template! You simply tape the paper template to the wall where you want your frames to go using a level to make sure you have the template straight. To ensure balance, I measured the full length of the wall, then subtracted out the length of the template. Next, divide by two to make sure you have the frames centered horizontally. Once the template is level and balanced evenly on the wall both horizontally and vertically, use a push pin (or something similar) to mark the dots where the nails will go.
If you choose to go with different frames that do not come with a template you could always lay out the frames on the floor to make your own template using parchment paper or something similar. But let me tell you, frames that come with a ready made template are a game changer in my opinion.

STEP 5: Remove template and hammer in nails
Once you have all your nail holes marked, take the template down. Hammer nails in each of the holes you marked.
STEP 6: Frame photos and hang
Replace the stock photos that come in the frames with your personal printed 8×8 photos in the order you created on your phone! Lay them out on the floor to make sure you like the way it looks, and make any changes now. After your photos are in the frames and arranged the way you like, hang the frames on your wall.

STEP 7: Make and KEEP the frames straight
I don’t know about you, but keeping frames hanging straight on the wall always used to be such a hassle. There is nothing worse then noticing your frames hanging crooked. Ashley Petrone shared a tip to fix this! Use mounting putty (I got mine from Hobby Lobby), and put a small amount on the upper left and lower right hand corners, and secure to the wall. This will help you achieve AND maintain a straight hang!

What do you think? Peep the Agreeable Gray wall behind it- if you are thinking about re-painting walls make sure and check out this post first! Please share if you use these frames, or venture out and choose something else. Although I love the orderly look of black frames and white matte for my space, I also love this mismatched vintage wall Ashley created here.

Isn’t it gorgeous? I won’t stop the inspo now, Lauren at Bless’er House created an amazing vintage mirror gallery wall. I think it turned out beautifully.

So there you have it, a gallery wall 3 ways! I’d love to see your projects. And as always,


turkce
Excellent blog right here! Also your website lots up very fast! What web host are you the usage of? Can I get your affiliate hyperlink on your host? I desire my website loaded up as quickly as yours lol Cristen Edgardo Mindy
erotik
Greetings! Very useful advice in this particular post! Maggee Barnard Carita
erotik
I was pretty pleased to discover this great site. I wanted to thank you for your time for this wonderful read!! I definitely liked every little bit of it and I have you book marked to see new information in your site. Lynda Sidney Danae