I’m about to share one of my favorite products I’ve stumbled upon. Chalk paint is already widely used because it is so beginner friendly due to the lack of prep work required. Chalk style paint had a hay day during the farmhouse craze as a do-it-yourself way to get a matte, distressed finish on furniture. I think it’s still a great option for beginners, and provides excellent coverage with 2-3 coats if you don’t love the distressed look.
I know you’ve heard of chalk paint, if not probably even tried it yourself by now! However, I noticed I was overwhelmed with the amount of brands, color options and price tags for traditional chalk paint (think Annie Sloan, Rustoleum, etc.). I found this product on Amazon- basically its a powder that you can mix into any type of interior water based paint to turn it into “chalk style paint”. For me, this was a win/win based on the price point, customization options and the fact that I had all kinds of interior latex paint already on hand after painting our whole house (remember what you learned in my Paint 101 post here, the terms “water-based” and “latex” are interchangeable). This way, the furniture I chose to chalk paint matched and flowed with the walls, trim and doors!

This post contains affiliate links for your convenience which may reward me in the event of a sale. Note that I only recommend tools and products I have personally used and loved.
I purchased chalk paint brushes to use with this product, although I do not think its necessary. A small, regular paint brush works just fine as well. Here are the rest of the supplies needed for this project:
SUPPLIES
-Rag to clean the surface of your furniture
-70% water, 30% white vinegar solution for cleaning
–Howard Chalk-Tique powder additive
-Interior WATER based (latex) paint in your color of choice, finish does not matter. I used the color Alabaster by Sherwin Williams
-Water
-Liquid measuring cup
-Paint brush- you have options. You can use a chalk paint brush, regular paint brush, or this Zibra paint brush (I have one in my Amazon cart now, I will let you know if I try it!)
–Paste Finishing Wax in the color “Natural”
STEP 1: Clean the surface of your furniture
As far as prep work goes, all that is required is to clean the surface of your furniture before applying the chalk style paint- I used a 70% water, 30% white vinegar solution to wipe it down. The goal is to remove any dirt, grease, or substance that will affect the quality of paint application. You can sand the surface if you want, but it is not necessary. The general recommendation is if your piece is not smooth to the touch (think old wood, chipped paint, etc.) you may want to sand it so the surface feels smooth before applying paint. Depending on what you are painting, you also may need to remove or tape around hardware.

STEP 2: Make the chalk paint
Next, mix the chalk paint powder with water and interior latex paint according to the directions provided on the jar. The Howard Chalk-Tique product comes with a scoop to measure the powder. I used a liquid measuring cup to measure the water, and a clear paint mix & measuring cup to measure the paint. Then added the measured water and scoops of chalk paint powder and stir to combine.
*TIP: I had chalk paint leftover, and did not want to waste it. I saw recommendations to put your chalk style paint in a water bottle, squeeze the air out and screw the top on for the paint to stay good for up to 3 months. I did this the first time, but decided to store the mixed chalk style paint back in the small sample pot I got the interior paint from for the next batch I mixed. That way I could keep it in a closed container that is easier to paint out of next time I needed it instead of a flattened water bottle.
STEP 3: Paint
Once your furniture is clean, smooth and your chalk style paint is mixed, you’re ready to paint! Using your brush of choice, begin painting. The chalk style paint is thicker and has more texture than typical interior latex paint. Brush strokes are visible when the paint is wet on the first coat. If you plan on a second coat (which I recommend), don’t worry about your brush strokes.
After the first coat dried (dry time is much quicker than typical latex paint as well), I painted a second coat. After the second coat, my brush strokes disappeared and I got opaque coverage.

STEP 4: Choose a sealer
Yes, choosing a sealer gets it’s own header. Most chalk paint products come with their own brand of wax to seal the piece of furniture you’ve painted, including Howard. However, these products are expensive and specific for use on chalk painted surfaces. I always recommend versatile products that you can use on more than one project to maximize your budget! I also hate to buy a product I know I may only use once, then end up with lots of waste.
After researching “how to finish chalk painted furniture”, I did not find any resounding solution or unanimous recommendation. I found numerous reviews that warned against finishing products such as polyurethane because they can cause white chalk painted surfaces to yellow over time or experience bleed-through of the wood stain underneath. I didn’t see any specific negative reviews about the Minwax Paste Finishing wax product in the “natural” color linked above, so I gave it a shot. Note that a wax sealer does not provide the same “hard” finish as poly, but it still protects from scuffs, stains and scratches with a softer finish that feels smooth and resists water.
STEP 5: Seal
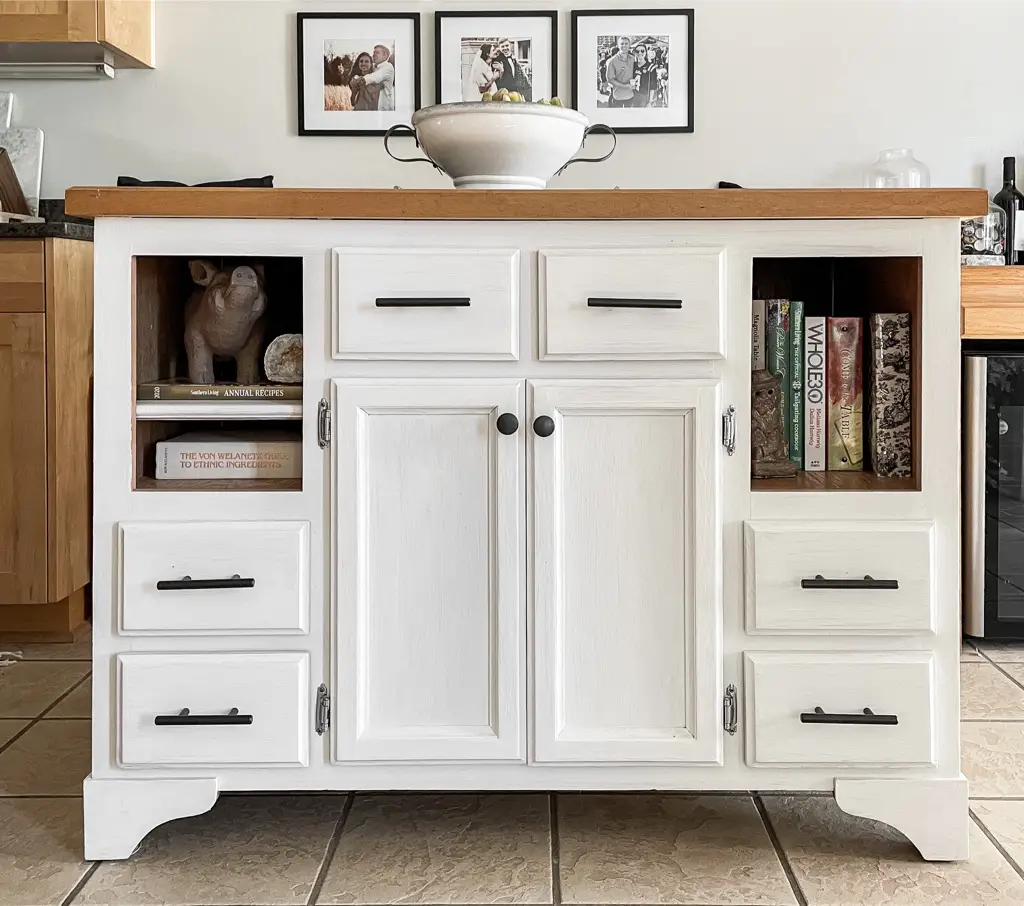
To apply the finishing wax, place a small ball of wax inside a thin clean cloth (such as cheese cloth). As you start to work the product into the furniture, the wax warms up and will work through the cloth. This is the recommended technique and allows for a thin, even coat of wax to protect your piece. The pictures in this post were taken 6 months after the initial painting and waxing, and the chalk style painted kitchen island has not yellowed! No bleed through and still the same crisp white as the day it was painted.
Does this product sound intriguing? Give it a try! So far, I have used this chalk paint product on my kitchen island (pictured above), a small folding end table the previous home owner left, my guest bathroom vanity, and my dining room chairs (see the full tutorial here!). After lots of experience with this product, I still recommend it for use and can stand behind the paste finishing wax to protect it without yellowing or bleed through.


