A step-by-step tutorial to DIY wooden entryway wall hooks to bring attention to a space that isn’t big enough for a table, chair, etc. Read on to learn how to make your own entryway wall hooks from a wooden board, and learn from my mistakes!
I had been fan-girling over this entryway from Mindfully Gray for some time. I put my thinking cap on, and decided how to DIY my own!

This post contains affiliate links for your convenience which may reward me in the event of a sale. Note that I only recommend tools and products I have personally used and loved.
I have found options to purchase similar wooden entryway pieces from Hobby Lobby, Joss & Main, and Wayfair. Let’s break down the pros and cons of building your own vs. buying wooden entryway hooks.
A con of building your own is potentially price- I made a rookie mistake (I will explain later) and ended up having to buy a second piece of wood and essentially start over. If you only need to purchase one piece of wood, I think you would come our cheaper making it yourself than purchasing .
Now for the pros of building it yourself.
1. Customization- you cut the wood to fit your space! Who doesn’t love a custom look.
2. Pride. There is nothing quite like looking at something everyday and thinking, “I designed and built that”.
3. Control over the stain color and style of hooks. You have complete creative reign if you make it yourself! So many options to customize it to match your space.
Have I convinced you to build your own wooden entryway wall hooks yet? Lets give it a go!

Supplies to DIY Wooden Entryway Wall Hooks
–1×6 poplar board- more on how to select the best board later
-Miter saw- you need it to make 1 cut
-Stain- I used Minwax Weathered Oak and Special Walnut to make a custom mix I like to call “Weathered Walnut”
– Hooks
-Drywall anchors with screws included
-Drill

STEP 1: Choose your wood
You can research how stains react on different types of wood if you scroll toward the bottom of Lauren from Bless’er House’s post here. I liked the look and price point of Poplar (not the cheapest, but not the most expensive either!).

I chose 1x6x8 Poplar wood. You can buy wood at Lowes or Home Depot, and probably local stores as well. I went to Lowes and chose the prettiest piece of Poplar they had based on wood grain pattern. Listen and learn so your project comes out cheaper than mine. You can still consider the wood grain pattern when selecting wood, but MAKE SURE THE BOARD IS STRAIGHT.

This will require you to pull the boards out, line them up on the long edge and look to see if the board is straight.

That way it will lay flat against your wall! I didn’t know this and my first board was warped and very wavy on the long edge. I tried multiple methods to straighten it to no avail and had to get a new one.
STEP 2: Measure and cut the wooden board
Once you have chosen your wooden board and get it home, measure your wall space to know where to make your cut. For my entryway, the wall is 57 inches long. Mark the length on your board, remembering to always error on the long side just in case. I used a miter saw to make the cut. It was a little long the first time, but I was able to sand it down for a snug fit.

STEP 3: Sand and Pre-Stain the wooden board
Next it’s time to prepare your wood for stain. This includes a light sanding. I used my mouse sander with 120 grit sand paper, then finished up with 220 grit for a smooth finish.
Wipe the board with a clean tack cloth to remove any sawdust or debris. Now you are ready for the Pre-Stain. It is always recommended to apply Pre-Stain to promote even stain penetration and avoid splotching and streaking, especially on lighter and softer wood species. Follow the manufacturer’s recommendations listed on the product to apply Pre-Stain.
STEP 4: Stain
Before applying stain, experiment on the small piece you cut off of your board until you get a color you like! Mine is a combination Weathered Oak and Special Walnut, what I like to call “Weathered Walnut”. Apply the stain per manufacturer’s directions printed on product.

If you want the wooden board to match stained wood you have elsewhere in your house, you can always use this strategy to ensure a perfect match and help the wooden hooks blend in with vibe of the rest of your house.

STEP 5: Measure spacing and mark holes for hooks
Math is not my strong suit, which is why I am a Speech Language Pathologist. Thinking about trying to calculate how to evenly space 5 hooks on a board that is 57 inches long makes my head spin. My advice is to eye ball it first. Lay your hooks out in a way that looks even, then measure.
This at least gives you a starting point, and from there you can adjust them as needed to ensure even spacing. Mine ended up being about 11 inches apart, but the ones on the end were only 2 inches from the edge.

My hooks attach with two screws, so I laid them out on the board and marked each hole with a pencil. Because the length of the screws may be long enough to penetrate through the back of the Poplar board depending on your hooks, I would recommend not screwing them in until the board is on the wall.
STEP 6: Attach to wall
Disclaimer: our house was built in 1979, and our walls are all bowed! It’s not something you notice with the naked eye until you try and attach something long and flat to a wall. So although the first board I purchased was not straight, the mistake was exacerbated by the warped wall.
A simple nail will not hold your board to the wall if it is bowed, nor will it allow you to safely hang heavy objects/multiple coats from the hooks. You will need to apply significant pressure and use screws and drywall anchors to adhere it to the wall.
STEP 7: Screw in hooks
Once your board is secure on the wall, you can screw in the hooks.

STEP 8: Decorate and enjoy!
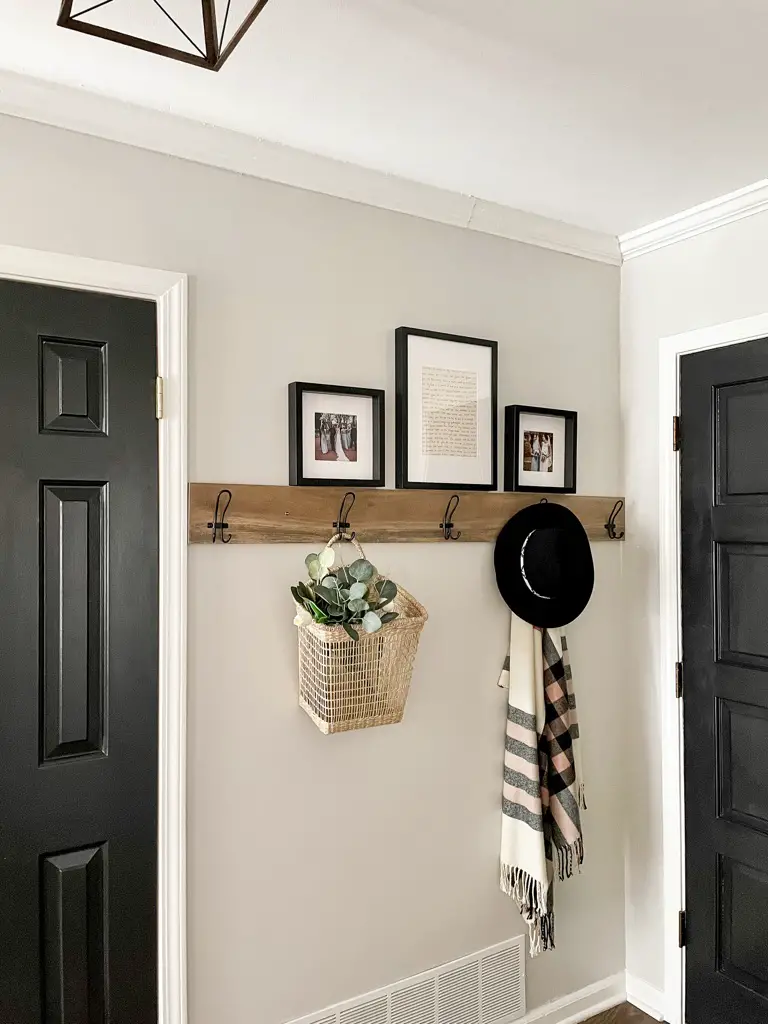
My favorite part of this wooden entryway wall hook project is the space it provides to decorate according to the season! It was so beautiful this fall with wheat and orange leaves in the basket with an autumn colored blanket scarf, and a great place to hang Christmas decor.
Depending on how often you use your entryway space, it can serve as a landing zone to drop backpacks and coats to keep it organized. For me its mainly decorative but I smile every time I pass it.
The black frames are from Ikea, and I display 2 wedding photos and the note we wrote the previous home owner when we submitted our offer on the Riverdale Ranch. It reminds me of how hard we had prayed for a perfect house to start our married lives together in, and brings me gratitude to reflect on our answered prayer.

To decorate, you could get gallery wall art inspiration here, or maybe incorporate this project into one of the first things you do after closing to make sure guests feel welcome in your new home!


Extras:
Wall color: Sherwin Williams Agreeable Gray in Eggshell finish
Entryway light fixture: Amazon
Entryway jute rug: Ikea Lohals
Hanging Basket: Ikea Lustigkurre
Picture Frames: Ikea Ribba


