Add character and timeless elegance to your home by installing picture frame moulding on your walls. It is an overall inexpensive way to add custom architectural elements. Let me teach you how to install DIY picture frame moulding like a pro!
First, I want to take a moment to remember where this dining room started. This is proof that dreams really do come true! If you can see it, you can do it. This all happened one step (and project) at a time, over the course of a year and a half.


I wrote a before and after post to detail the evolution of this room. Broken down simply, here are the dining room projects I’ve already completed:
– Painted trim, walls and ceiling
-New light fixture
-Refinished dining room table and chairs
-Refinished a vintage bar cart
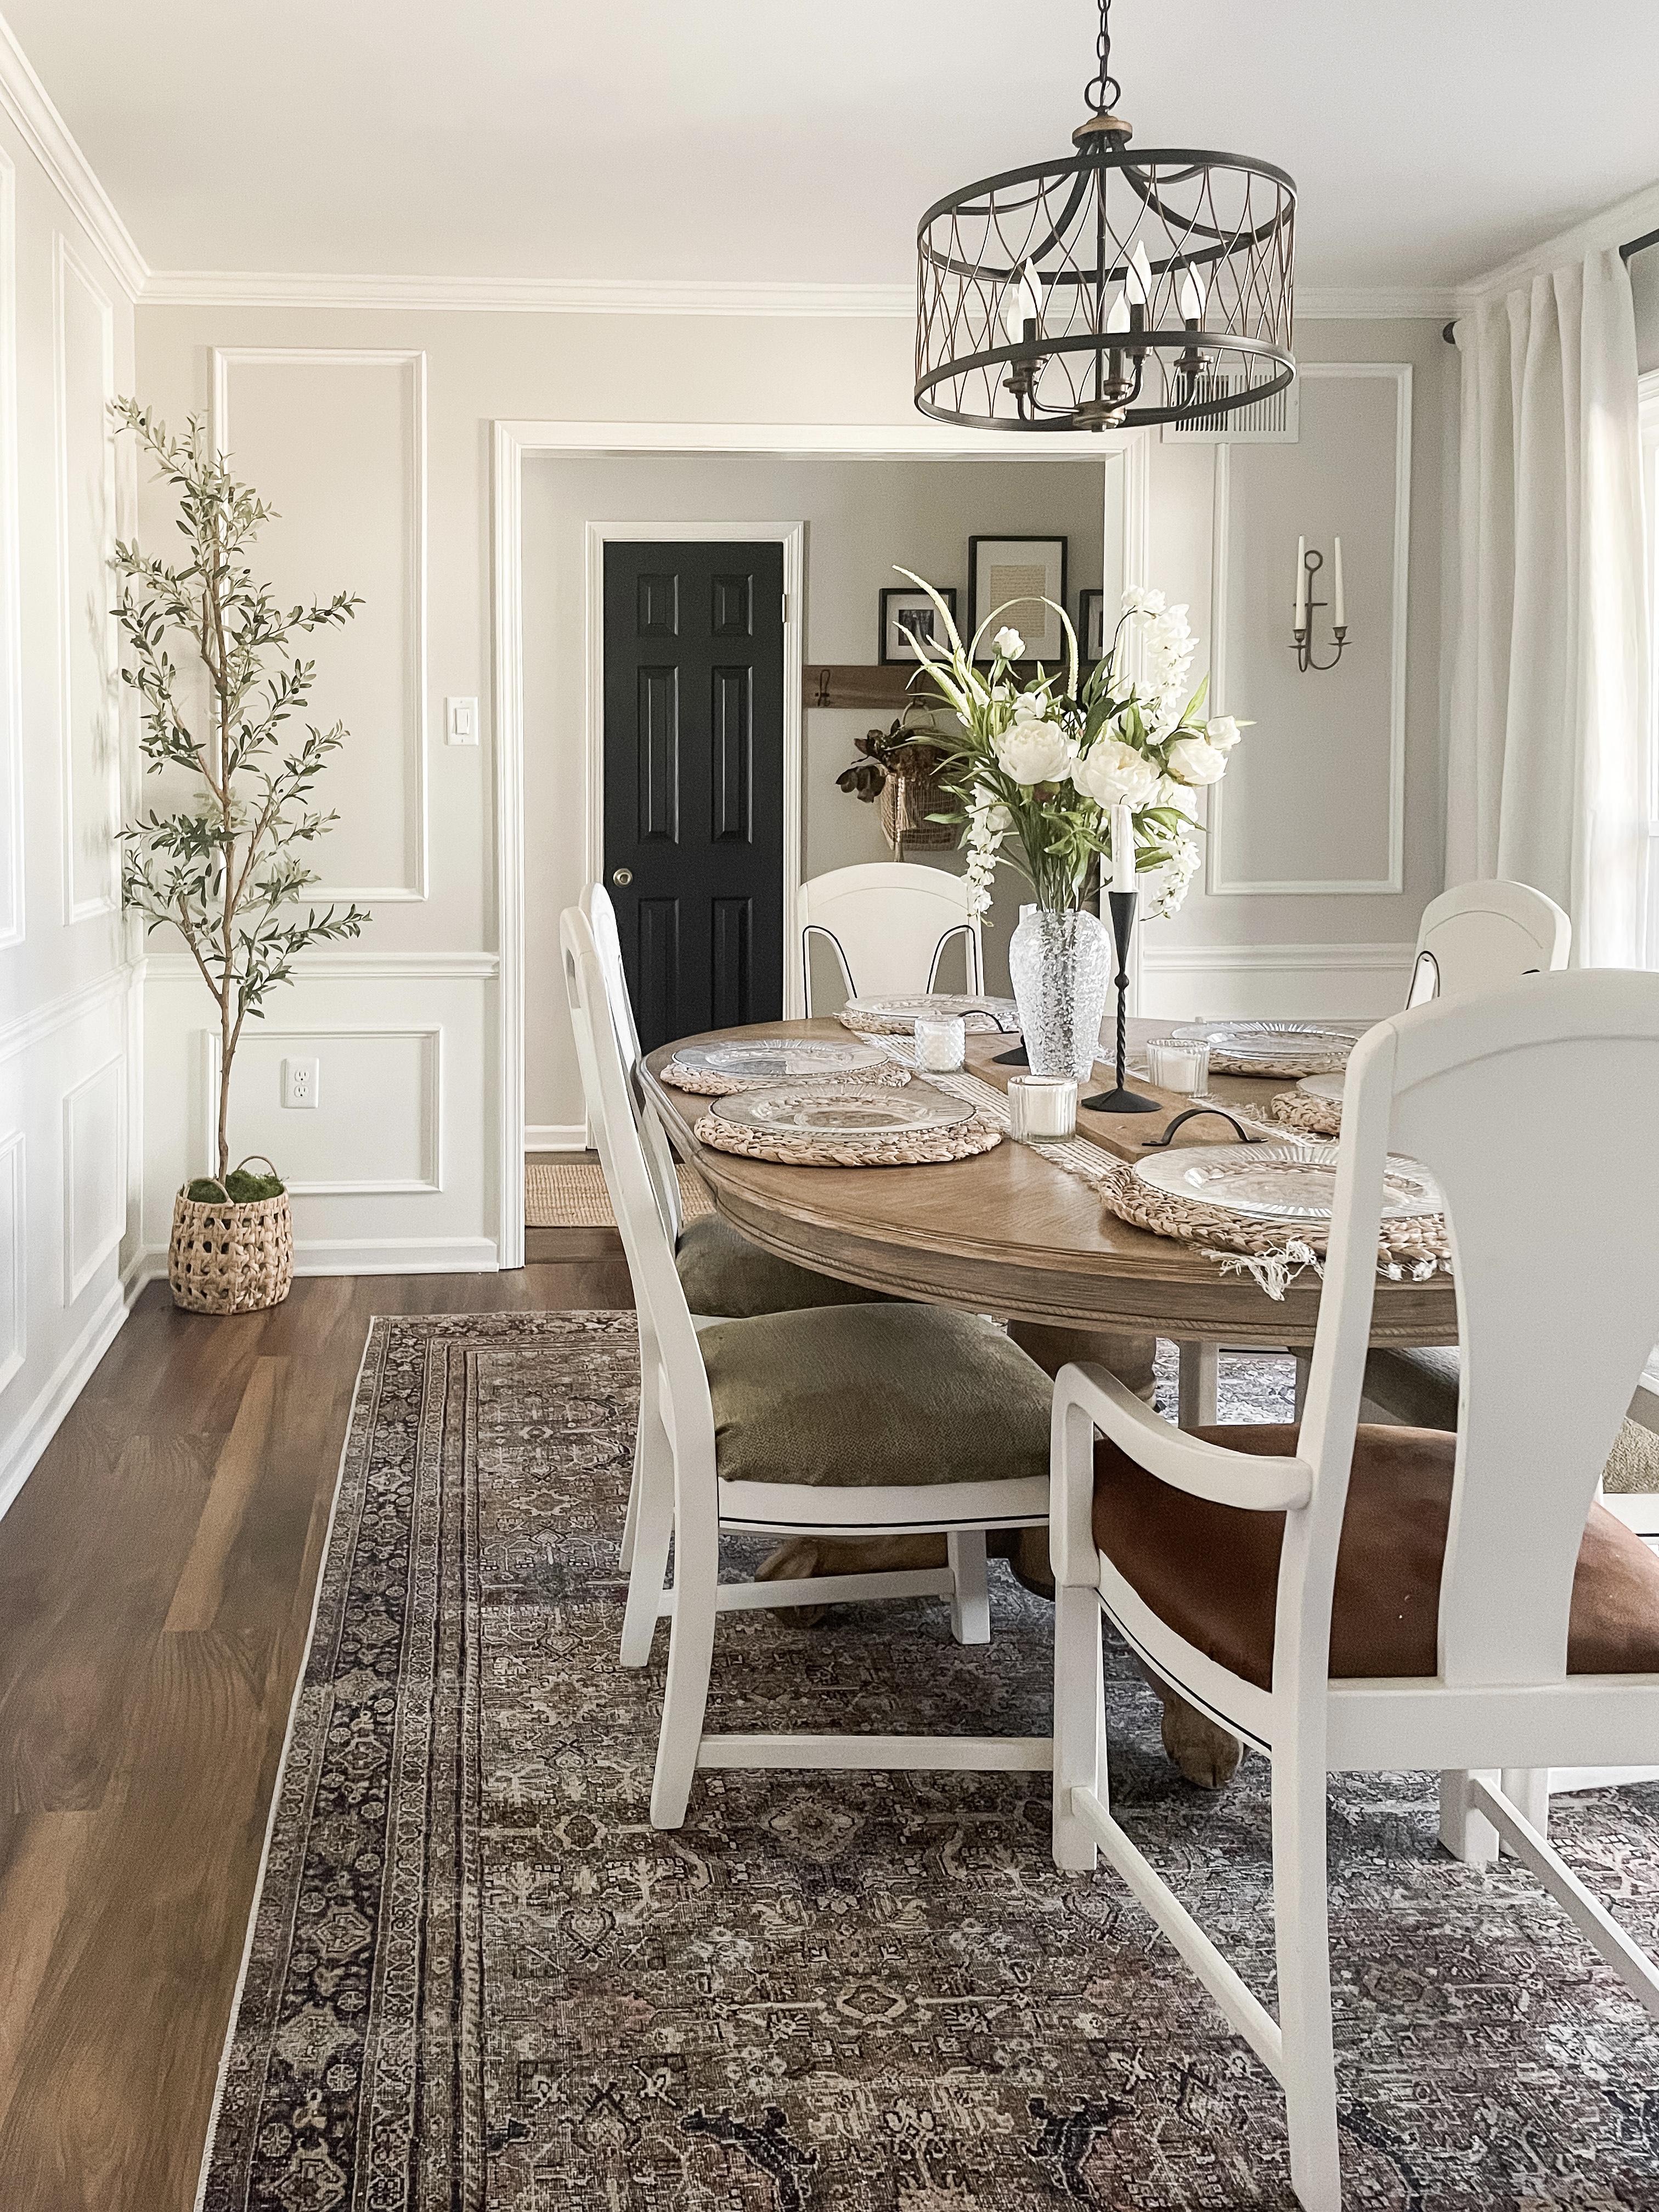
I let the room rest for a while and took my time deciding what (if anything) was next. I love how wall moulding can elevate a space and instantly add elegance and customization. What this room was missing was wall moulding!
I already had a chair rail, so I included that into my equation for adding DIY picture frame moulding. Picture frame moulding is exactly what it sounds like. It is thin pieces of trim, installed in a rectangle or square resembling a “picture frame”. There is so much creative freedom to this type of frame approach, and I will explain the reasoning and thinking behind how I chose to install my DIY picture frame moulding.

This post contains affiliate links for your convenience which may reward me in the event of a sale. Note that I only recommend tools and products I have personally used and loved.
SUPPLIES TO INSTALL DIY PICTURE FRAME MOULDING
-Trim pieces: PVC composite white ply cap moulding (11/16 in. x 1-1/8 in. x 8 ft.)
-Pencil
-Interior latex paint


STEP 1: Plan
Considerations when Installing DIY Picture Frame Moulding
Once you’ve chosen the room you want to add picture frame moulding to, keep these considerations in mind. You want to keep consistent spacing between your boxes and existing trim. However, the sizes of the boxes can vary.
My dining room space has four walls, three of which have a mix of doorways and windows so that they are all different. I also had art, mirrors or candlesticks on three of the walls, so I planned the boxes around the existing decor. Your boxes don’t all have to be identical or match.

During this planning phase, you also want to consider the location of light switches, electrical outlets, and air vents. Make sure and plan your boxes around them, you don’t want to have to break up a box just because you run into a light switch plate you could’ve avoided.
Last, most trim pieces are 8 feet in length. Try to keep your measurements in mind so you can make the most of your supplies. You don’t want to consistently leave 2 feet left on each piece that is too short to re-use if you can help it!
Map it out
Math is not my strong suit. I am definitely more of a visual person. With this in mind, I taped out boxes using painter’s tape before gathering any measurements, simply based on sight. I modified them easily by moving the tape around until I had shapes I was happy with. Then, I pulled out the tape measure to see what kind of measurements I was working with.

Mock up
I prefer pen and paper, so I drew a draft of each wall and box, complete with distances of each box and the spaces in between. You could also do this electronically on Word, Pages, Canva, etc. You know what they say, measure twice, cut once.

This step is super important, and I would recommend measuring the wall one more time to make sure all the numbers on your mock up add up. I marked the outer corners of all the boxes with pencil so I could use them later when actually installing the trim.
STEP 2: Gather supplies
Using the measurements from your mock up, decide how many total feet of trim you will need. Make sure to factor in enough trim to compensate for errors and waste pieces, which hopefully you planned to minimize during the planning step!
As far as choosing the trim, you have options. I preferred trim 1-2 inches in width. Home Depot sells both a raw wood option and a white PVC composite trim option. I went with the PVC composite since it was already white. It also seemed softer, easier to cut, and flexible! Our walls are often bowed, so I wanted the trim to bend with the walls to make my job easier.

Next, you MUST buy miter shears! For one, they are more beginner friendly as they replace the use of a miter saw. And two, it’s a piece of cake to cut 45 degree angles with them. Which you will need to cut on every.single.piece. And third, I can’t tell you how nice it is to complete the entire project while remaining in one space, not having to run back and forth to the miter saw in the garage. The miter shears make it possible to make all your cuts in the same room you are installing the trim in. It is a game changer. Gather the rest of the supplies on your list and you are ready to go.

STEP 3: Make cuts
Use your miter shears to make cuts. Remember that the thinner, decorative edge will always form the inside of the boxes. Make sure that your measurements are made on the thicker edge that will serve as the outside border of your boxes.


I cut pieces to make one box at a time, and laid out the box in front of the wall it would go on. This kept me organized, but there are lots of different ways you can do it.

After I finished the smaller boxes and was ready to install the larger boxes, a lightbulb went off in my head. 5 of the boxes would be the exact same size, using the same measurements to cut the pieces. I measured and cut painters tape and adhered to the floor as a guide. Then, I measured and cut each piece of PVC according to the guide on the floor. This saved me time by not having to mess with the measuring tape for each cut!

STEP 4: Install
Once you have completed all of your cuts, it’s time to install your picture frame moulding. You will need a level, a pencil and your brad nailer. I had my corners marked from previous measuring which was helpful. I usually started with the bottom piece, and held up my level to ensure it was straight. Depending on the length of the trim piece, I installed at least 3 nails. I nailed the center first, then the outer edges.
I highly recommend a cordless brad nailer for efficiency and safety. I can tell you first hand how difficult installing wall moulding with a hammer and nails is. Unfortunately, had to I install a small board and batten wall in the bathroom without a brad nailer the old fashioned way. I had a swollen, bruised thumb for weeks. Save yourself the headache and invest in the brad nailer. You wont’ regret it!


After the bottom piece is installed, I nailed in one side, the top, and lastly the other side. Note, all of my corners did not line up perfectly or flush. That’s ok! You can use spackling to fill in the space later.
Time for a tip
I will also note, there are more secure ways to install your DIY picture frame moulding. I’ve seen people use different types of adhesive to glue as well as nail the trim to the walls. For me, that’s too permanent! And doesn’t leave room for error.
While installing, I had all box sizes chosen and planned out. However, once I actually saw the trim boxes on the walls, I decided I wanted the top boxes to be slightly narrower than the bottom boxes below them. This was an easy fix since I had only used brad nails to install the trim.
I was able to quickly and easily remove the moulding from the wall. Then, I made cuts to trim a little off the top/bottom pieces, and re-install. This was all done with extremely minimal dry wall damage. Had I adhered the trim pieces to the wall with anything more substantial, I would not have been able to quickly modify the boxes per preference, or in case of errors.
STEP 5: Hide your seams
Spackle
I chose to use this spackle over wood filler because it’s white, and claims to not need sanding. It worked great for me. I simply pushed it into all the nail holes and corners with gaps, then used a baby wipe to smooth and wipe away any excess product.


Caulk
Next, I laid a bead of caulk along the gaps and corners, following the interior and exterior border of my box. Then, used a baby wipe to push the caulk into the gaps to create a seamless finish. Run the baby wipe over the area again as many times as necessary to clean up the excess caulk.

Time for a Tip
The bottom boxes went so smoothly, as the wall and box was all going to be painted Alabaster by Sherwin William. However, the top walls were Agreeable Gray by Sherwin Williams, but I wanted the boxes to stay white (I planned to paint them Alabaster). I spackled and caulked the bottom boxes freely (without tape), then painted.

For the top boxes, I thought it’d be smart to go ahead and tape before I applied Spackling and caulk. So I taped off all the borders of the box, then spackled, then caulked, then painted. When I went to remove the tape after everything was dry, it tore the seam of the caulk. See what I mean?

I didn’t think that one through all the way. To fix this, I had to re-caulk all the seams. Next time, I would spackle and caulk first, without tape. I would add tape before the painting step only after the caulk was completely dry! That way, the cracks would remain filled with caulk then I could paint over them.
STEP 6: Paint
Since the PVC composite is already white and claims to be durable, rot, and termite resistant I didn’t feel the need to prime. Once the spackle and caulk was dry, I painted all the trim Alabaster by Sherwin Williams. Your paint brush choice depends on if you are only painting the trim, or painting the trim and the wall the same color. I’ve had fun using these paint brushes recently.

Once the paint is dry and you have removed any painter’s tape, you can see the moulding in all it’s glory.
STEP 7: Clean up
During my project, I scuffed up my walls quite a bit with the level. Since I only have two hands, it was difficult to juggle the trim piece, level and nail gun at one, especially with the taller boxes. This resulted in bumping, scraping and knocking the level against the wall frequently.
Luckily, a Magic Eraser dampened with a little water takes those scuffs right off. My walls returned to looking brand new.
I really can’t decide if I think it makes my room look bigger or smaller. But I can say it completes the room. The picture frame moulding brings so much character and formality to a room dedicated to “formal dining”. I love it. And you will too!

As always, let me know if you have any questions if you give this project a go. There are more details, photos and videos documenting this process on my Instagram if you need them!


Meagan Pullum
Hmmm… Where do I need this in my space?!!? Thanks for sharing!!
Emily
🙂 thanks Meagan!! Such a fun DIY project.