A step by step tutorial showing you how to hand embroider as a beginner. If you are wanting to learn this craft for the first time, you have come to the right place! Learn this slow and satisfying art along with me and create custom pieces you will treasure.
After the birth of our sweet baby Rone, I was finding it difficult to dive into a big DIY project. The short windows of time during naps or play were not long enough to put a dent in a project, and I found myself frequently frustrated. So instead I changed my expectations, enjoyed the slow pace, and looked outside the box to satisfy my need to create.
The baby’s nursery was the last large scale project I completed, and documented the transformation as part of the One Room Challenge. Since her birth, I have shared my favorite textured paint hack to update fun vintage vase finds, and how to reuse pistachio shells to create faux succulents This post contains affiliate links for your convenience which may reward me in the event of a sale. Note that I only recommend tools and products I have personally used and loved. All prices listed were current as of publication date, but are subject to change.that will never need to be watered (or die! hallelujah!).
I stayed curious on other projects I could complete that were smaller scale and did not require me to move far from the couch. I came across hand embroidery, and thought this would be a great time to learn this skill.
I will teach you everything you need to know as a complete beginner. In other words, I will explain how to hand embroider like you are five, because this is exactly how I have needed it explained to me! We will walk through the supplies you need, how to complete the basic stitches, and plan some fun custom projects.
Don’t have time to read the whole post now? Pin it here to safely save it for later!

This post contains affiliate links for your convenience which may reward me in the event of a sale. Note that I only recommend tools and products I have personally used and loved. All prices listed were current as of publication date, but are subject to change.
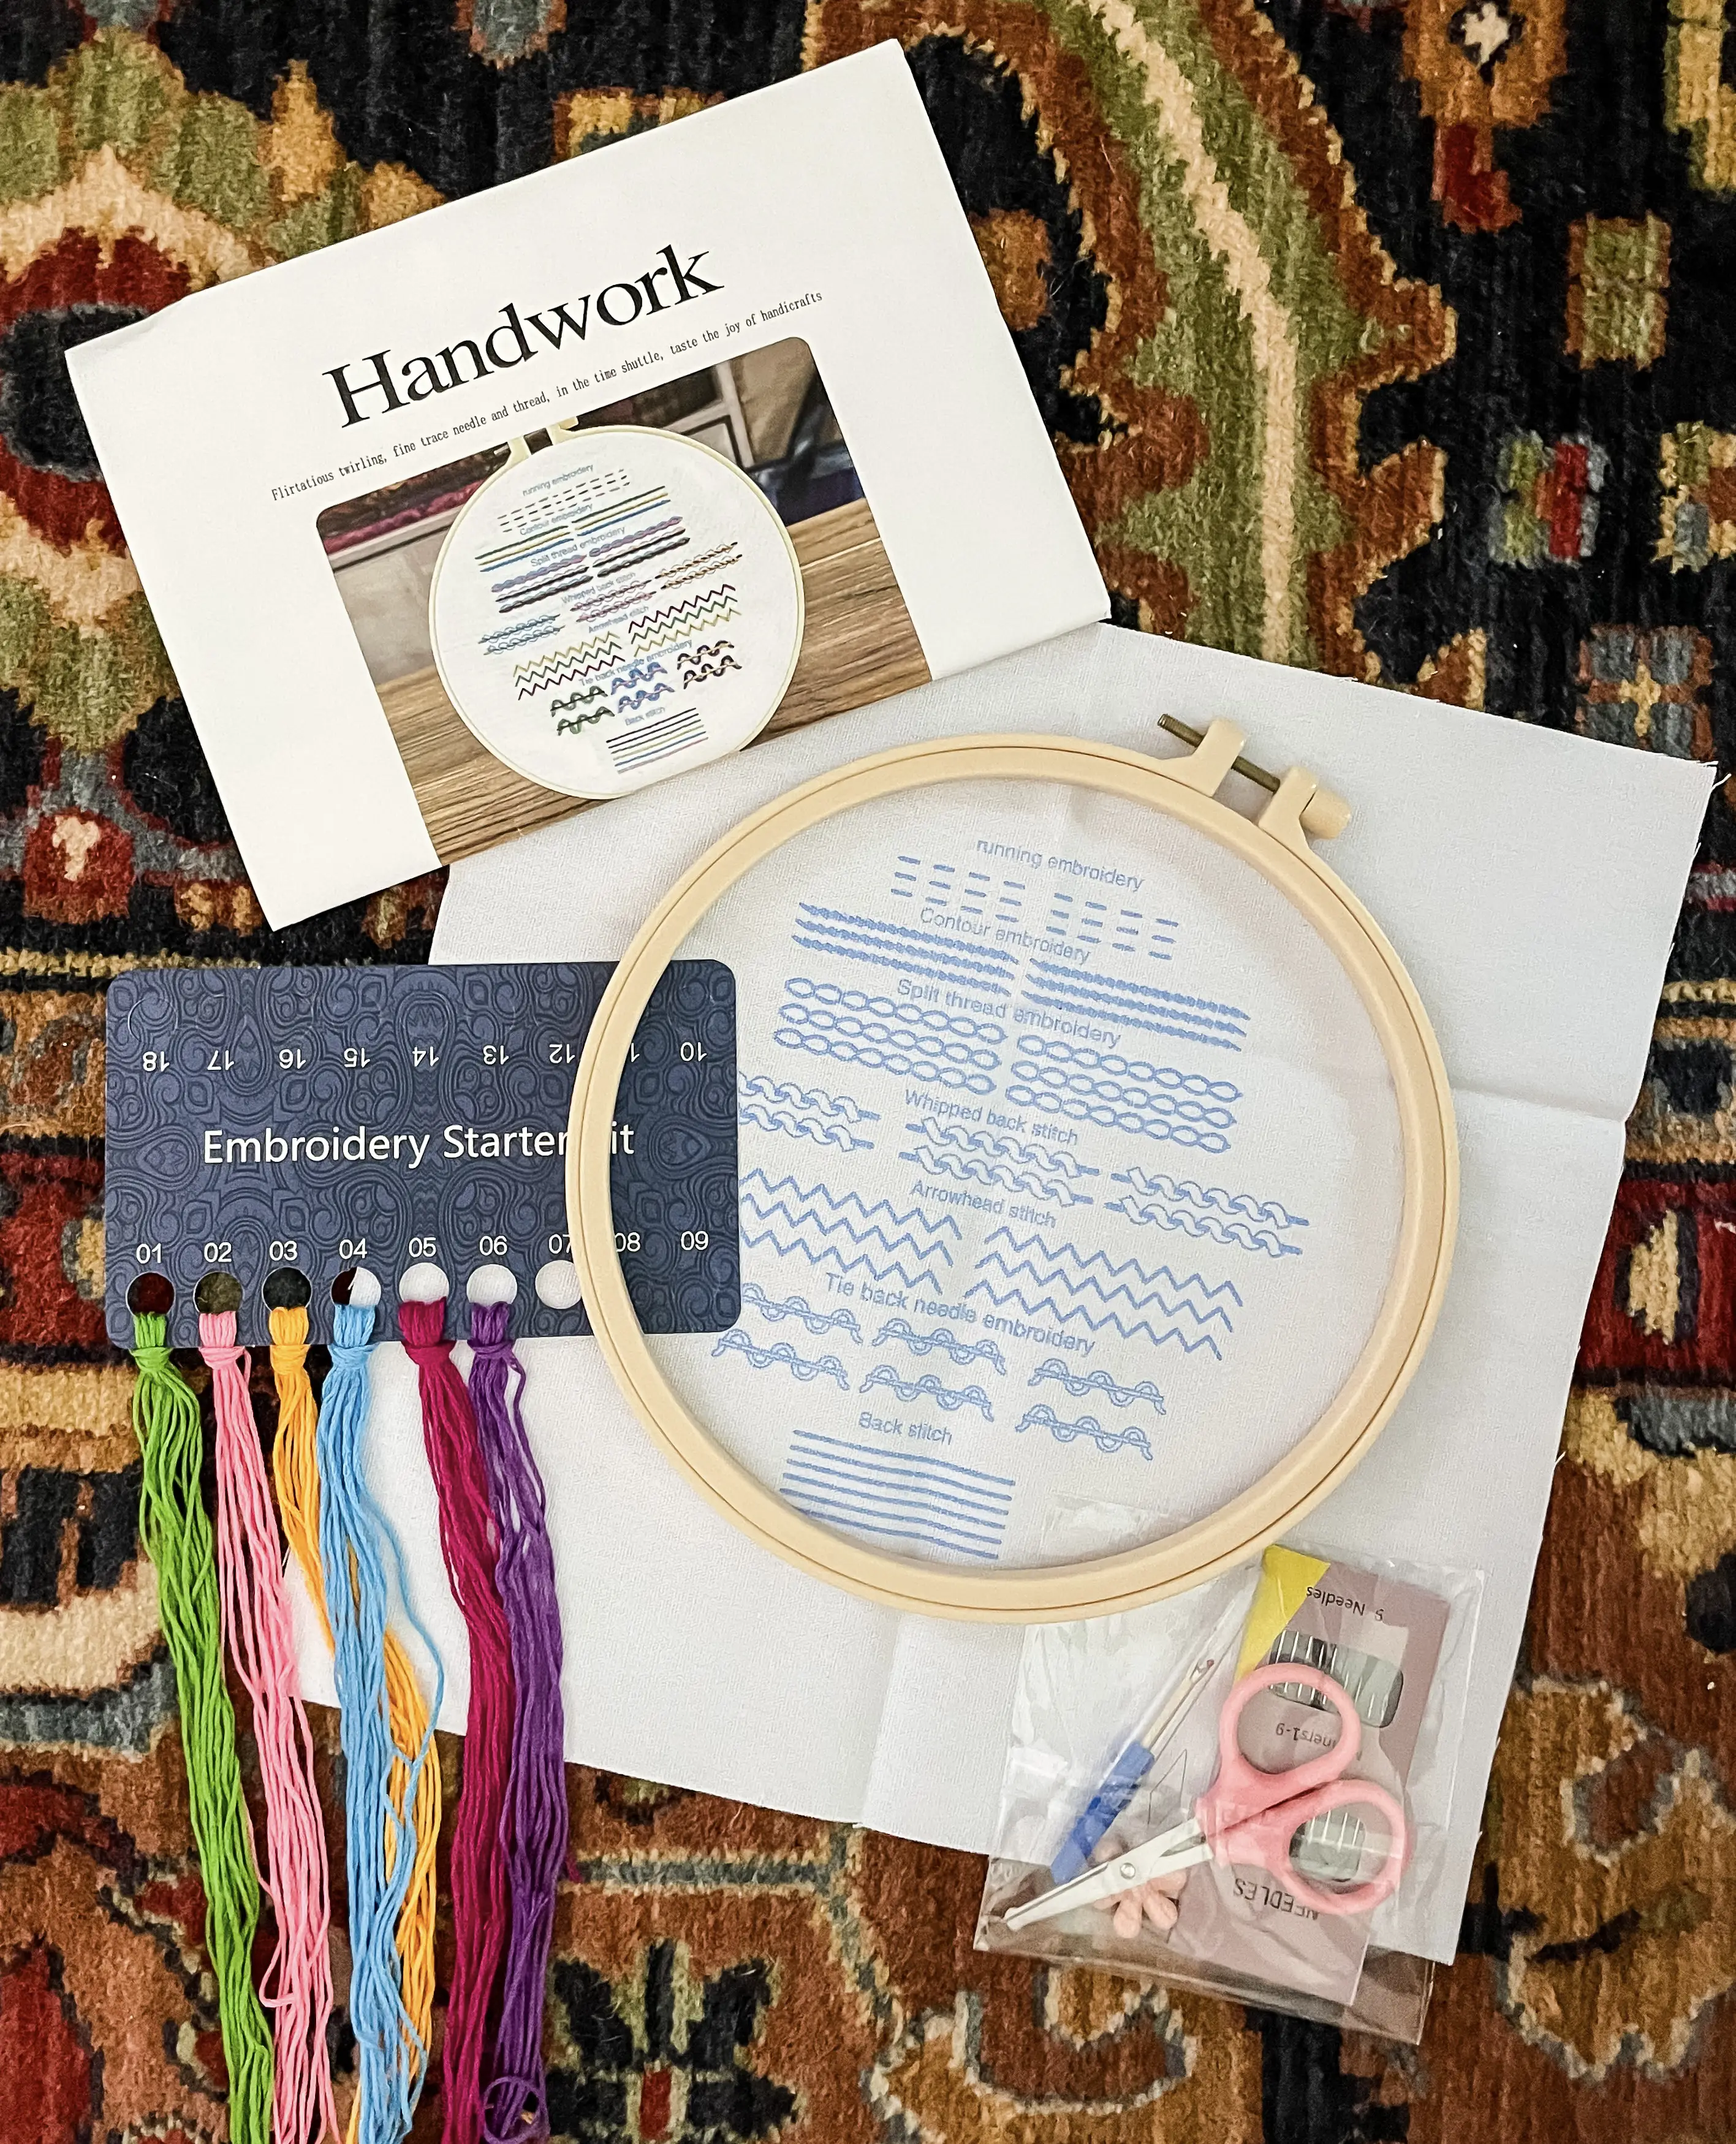
How to Hand Embroider: Supply List
If you are a true beginner who has nothing and is starting from scratch, I recommend this kit. It includes many of the supplies listed below including fabric with the basic stitch patterns printed on it, needles, thread, scissors, a hoop, needle threader and a seam ripper.
If you already own some supplies or do not want to go the all-inclusive kit route, here is your supply list
-Fabric: fabrics with a visible weave like linen, cotton, wool and felt will be the easiest
-Embroidery needle
-Thread: for embroidery, the thread you use is also known as “skeins” of cotton embroidery floss. Think the string you used circa 2000 to make homemade friendship bracelets
-Embroidery scissors
-Hoop
-Embroidery pattern or design: this can be anything you can trace, draw or print!
-A way to transfer your design to your fabric: this can be a washable pen, a heat transfer pen, or sticky water soluble stabilizer
Optional:
-Iron on backing: this may be recommended to put on the back of your design if it is a piece of clothing that will be worn. A backing makes it more comfortable and durable
-Clothespins: can be used to neatly store your thread, more on this later
-Thimble: this may be necessary if you are working with a thicker fabric such as denim
-Needle threader: this definitely is not a necessity, but has been appreciated
-Seam ripper: also not necessary, but appreciated


How to Hand Embroider
Step 1: Choose a Design
If you are brand new to this craft, I recommend completing a starter kit. I personally used this one listed and discussed above. It will not only teach you the basic stitches, but gives you an opportunity to learn without pressure and gain confidence in your skills.
If you have already completed the starter kit, or chose not to, you must choose a design to stitch. You can find inspiration anywhere, but I prefer Pinterest. I have a Hand Embroidery Board that I am always pinning ideas to.
Your design can be purchased from Etsy or a craft supply store. If you are feeling extra creative, your design can technically be anything you can scan, print or draw. The sky is the limit! If you can transfer the design to fabric (which we will discuss later), you can stitch it.
Step 2: Prewash and Dry your Fabric
Once you have obtained all your supplies and chosen fabric you plan to stitch your design on, I recommend washing and drying the fabric. This step is especially crucial if it is clothing that will be washed and dried in the future! You want to make sure to prewash and dry to make sure the finished design doesn’t shrink or warp.

How to Hand Embroider: Step 3- Transfer your Pattern
If you are using an all inclusive starter kit, the stitch patterns are already printed onto the fabric so you don’t have to worry about transferring anything. You can skip this step.

If you are using your own design, you have some options. A common solution is to transfer the design onto your fabric by hand, using either a washable pen or a heat transfer pen. The washable pen uses ink that disappears with water, and the heat transfer pen disappears when heat is applied (i.e. a hair dryer).
If your design is printed or drawn, you will probably want to trace it onto your fabric instead of trying to freehand it. You an go old school and hold the design and fabric up to your window on a sunny day and trace it this way.
You can also utilize technology. If you can pull up your design electronically, you can use an iPad to trace the pattern. An excellent tip is to invert the colors of your design so that the background is black, and the lines are white. This makes it even easier to see and trace onto your fabric.
Third, you can use a light box to shine behind the design and trace onto your fabric. The choice is yours! There are pros and cons to all tracing options. The best choice may depend on personal preference, the tools at your disposal, or your specific project.
The final way to transfer your design is to trace it onto a water soluble stabilizer and use it as a stencil. This method may be helpful if you’re working with stretchy, thin, or delicate fabric. It will help prevent the fabric from warping or tearing under the pull and pressure of the stitches.
FAQ’s Regarding Water Soluble Stabilizers
There are two types of water soluble stabilizers. The first is the stabilizer only, and the second comes with a sticky peel off backing that adheres to your fabric. The kind with peel off backing can be used in your printer, which makes transferring an intricate pattern easier.
You can also trace your designs on your stabilizer by hand using any of the three methods listed above. A pen, fine tip marker, or pencil will work for tracing. I recommend using a color that is similar to the color of thread you’ll be using because the ink can sometimes bleed when you soak away the material.
Tips on soaking: Use warm water when you are finished to dissolve the stabilizer. In addition to simply soaking, you can also rub off the stabilizer material or rinse it under running water, then hang it to air dry.
Step 4: Hoop your design
Once you have transferred your pattern using the method of your choice, it’s time to bind your hoop. The hoop helps to pull the fabric taught and keep the material you are stitching flat. Lay the inner ring of the hoop down on your work surface, and center your fabric on top. Then, lay the outside ring on top and until it snugly hugs the bottom inner hoop. Once you have the hoops lined up with the fabric held in between, use the adjustable screw at the top of the outer ring to tighten it while keeping the fabric straight, tight and centered.

Here’s another tip- don’t forget to unhoop your fabric when you are done stitching for the day! You don’t want to permanently stretch our your fabric and stitches. Let your project breathe when you take breaks from working on it.
Step 5: Stitch Your Design
It’s finally time to stitch your design! Start by cutting the thread (AKA floss) roughly the length of your wrist to elbow. Emrboidery floss comes as six strands “married” together. Decide how many strands you intend to use for your design, and “divorce” them accordingly. I used two strands to practice and complete the starter kit designs. The fewer strands you use, the smaller and more intricate the stitch is. Thread your needle (which I like using the “needle threader” tool for), and begin stitching your design.

The six basic embroidery stitches are the running stitch, backstitch, split stitch, stem stitch, satin stitch, and french knot. As a beginner, I would prioritize learning and perfecting these stitches first. After you have these down, you can add to your repertoire and try different stitches for your projects.
The discussion to knot your thread (or not), seems to be a divisive one. We won’t go into that today, we’ll save that topic for another time! But as a beginner, I have been using knots to start my stitches. Run the needle through the fabric from back to front, and leave a tail a few inches long to double knot. That holds your thread in place at your starting point.
If you are running out of thread while stitching, leave enough of a tail to thread the needle through the back of your last stitch, and tie a knot to secure it before starting with a a new thread.
If you are using an all inclusive starter kit, the stitch patterns are already printed onto the fabric so you don’t have to worry about deciding which stitch to use. Remember to check the back of your fabric frequently to make sure you don’t have any tangles of thread.

How to Hand Embroider Step 6- Finishing Touches
Your design is stitched and finished, congratulations! You may be finished now, or may need to apply some of these finishing touches to your project.
If you are using an all inclusive starter kit, you don’t have to worry about anything else. Once you have finished learning and stitching all of the patterns you are done.

If you have embroidered a piece of clothing that will be worn, you may want to iron on backing to make your stitches more durable and the item of clothing more comfortable to wear.
If you have used a heat or washable pen, use the appropriate method to make any leftover or rogue lines disappear.
If you have used water soluble stabilizer, soak it off with warm water and let it air dry.
If you intend to display your embroidery in the hoop, you may want to finish it off by covering the back. There are lots of methods to do this, and you can choose your favorite. There is no right or wrong answer, just personal preference.
Finished the beginner stitching kit and looking for more inspiration? Here are some ideas I’m itching to try:
-Embroidered cocktail napkins
-Personalized muslin swaddle blanket
-Monogrammed baby bubbles and onesies
-Embroidered tea towels
-Wall art such as an embroidered birth announcement or seasonal sentiments
-Embroidered fabric to slip the back of a clear phone case
-Monogrammed wreath sashes
-Embroidered denim jacket
-Customized Christmas stockings
-Travel map (stitch the States/Countries you have visited)
I hope you feel prepared to begin this peaceful hobby! I have enjoyed learning the stitches and feeling inspired to create again. The slow pace matches perfectly with this season of life I am in, and I’m grateful to share. Let me know if you run into any problems or have any questions, I will do my best to answer. You can follow along on Instagram too!
Enjoy the process,


