Have you ever wanted to “de-orange” your dated, wooden cabinets or furniture? Welcome to my step-by-step tutorial where I will teach you how to create a weathered wood finish WITHOUT sanding OR staining! Ready to learn how?
I don’t know about you, but the thought of stripping the varnish and stain from wood to get down to raw wood, then re-staining and sealing sounds like a lot of work. And it is, I’ve done it. There is a lot of room for error as well. But, refinishing something you already own or have found affordably second hand is typically a better option than buying something brand new in a stain or finish you prefer.
Follow the tutorial below to learn how to achieve a weathered wood finish with NO sanding and NO staining required! This is probably the simplest way to get that light, natural Pottery Barn/Restoration Hardware wood finish over an existing surface. You can get this weathered wood look over paint, stain, or varnish.
Technique inspired by: Jaclyn Dorminy. Check out her Instagram and TikTok!

This post contains affiliate links for your convenience which may reward me in the event of a sale. Note that I only recommend tools and products I have personally used and loved.
SUPPLIES
-Rag to clean the surface of your furniture
-70% water, 30% white vinegar solution for cleaning
–Howard Chalk-Tique powder additive
-Interior WATER based (latex) paint in white or cream of your choice, finish does not matter. I used the color Alabaster by Sherwin Williams
-Water
-Liquid measuring cup
-Paint brush- you have options. You can use a chalk paint brush, regular paint brush, or this Zibra paint brush (I have one in my Amazon cart now, I will let you know if I try it!)
-Drop cloth
–Paste Finishing Wax in the color “Natural”
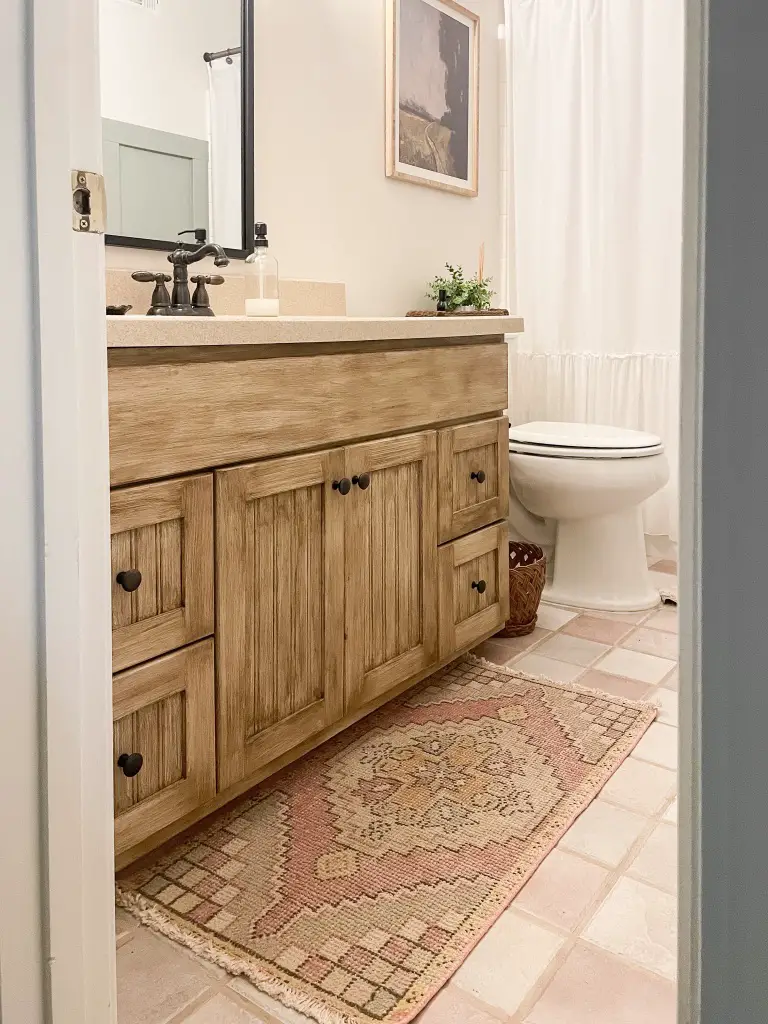
Supply list sound familiar? I have used similar supplies to achieve a weathered wood finish for my vintage bar cart refresh, dining room table and chairs! In this post, I’ll walk you through how I used this technique on my bathroom vanity.

STEP 1: Disassemble the cabinet
Remove all the drawers, unscrew the doors, and take off the hardware. If the new hardware you plan to install requires a different hole width, now is the time to fill the old holes. I was just updating the knobs, so I was able to keep the same holes.

STEP 2: Clean the surface
As far as prep work goes, all that is required is to clean the surface of the wood before applying the chalk style paint. I used a 70% water, 30% white vinegar solution to wipe it down. The goal is to remove any dirt, grease, or substance that will affect the quality of paint application.
You can sand the surface if you want, but it is not necessary. The general recommendation is if the wood is not smooth to the touch (think old wood, chipped paint, etc.) you want to sand it so the surface feels smooth before applying paint.
STEP 3: Chalk paint
I chose to use my favorite chalk paint additive to create a custom chalk style paint. For me, this product is great based on the price point, customization options and the fact that I had all kinds of interior latex paint already on hand after painting our whole house (remember what you learned in my Paint 101 post , the terms “water-based” and “latex” are interchangeable).
The Howard Chalk-Tique product comes with a scoop to measure the powder. I used a liquid measuring cup to measure the water, and a clear paint mix & measuring cup to measure the paint. Per directions written on the jar, you will add the appropriate number of scoops to cups of water, then add your latex paint and mix. See my post for more details about how to use the chalk paint additive.
I used Frog tape to protect the borders of the vanity against the wall, floor and countertop. Next, begin painting using your brush of choice. The chalk style paint is thicker and has more texture than typical interior latex paint. Brush strokes are visible when the paint is wet on the first coat. After the first coat has dried (dry time is much quicker than typical latex paint), I painted a second coat. After the second coat, my brush strokes disappeared and I got opaque coverage.

STEP 4: Antiquing Wax- the key to the weathered wood finish
I wrote about this product in previous posts outlining how I refinished my dining room table with Liming and Antiquing Wax (see the HUGE transformation here!) and my vintage bar cart.
The Antiquing Wax works so well over chalk paint and in my opinion can mimic a real wood finish over a painted surface. To use this product, be aware that a little goes a long way. Using a chip brush, get a small amount of wax on the bristles of your brush and work it into the surface using long strokes. It dries in a minute or two, so it’s important to work in small sections. Work it in with the brush until you have a look and texture you like. I sometimes do a second coat in places once the first coat is fully dried.

STEP 5: Seal
Once you have painted and applied Antiquing Wax, allow dry time and seal. I prefer a finishing wax to seal my furniture. Note that a wax sealer does not provide the same “hard” finish as poly, but it still protects from scuffs, stains and scratches with a softer finish that feels smooth and resists water.
To apply the finishing wax, place a small ball of wax inside a thin clean cloth (such as cheese cloth). As you start to work the product into the furniture, the wax warms up and will work through the cloth. This is the recommended technique and allows for a thin, even coat of wax to protect your piece.
STEP 6: Assemble your cabinet
Once the wax has dried, it’s time to install your hardware, and put your cabinet back together. I chose oil rubbed bronze hardware to match the faucet, towel ring, and toilet tissue holder.


Now you know how to easily achieve a weathered wood finish
What do you think? Looking at the before and after, I definitely managed to affordably and fairly easy turn this space into something that better suits my style. So far in this guest bath, I have completed the following projects:
-Replaced the mirror
-Bought a vintage Turkish rug
-Built a board and batten wall
It is possible to love what you already have with a little creativity and elbow grease. I hope to always inform and inspire.


